Braumat
Tipps and Tricks all Versions

1Recipe-Structure
Area
(different PCU’s):
Brewhouse
Fermentation
Filtration
Recipe-Category,
Recipe-Type
Production
CIP
Recipe-Nr,
Master Recipe
Pils
Export
Singha
Sequence
-> MTK, Lauter Tun, Fermentation-Tank, = Unit, RUP
MTK
Lauter
Tun
Wort
Kettle
Tank
1
Tank
2
FB1001
(Sequ 1), FB 1002 (Sequ 2) ……; always running all 1-Sec
DFM-Activation,
Sequence-Timer, Permanent Condition, etc etc.
Steps:
GOPs, EOP, ROPs, Phase, Control Strategy, SFC, SFC-Type
f.e.
Start-up, Heating, Rest,
FC1001,
FC1002, FC1003 etc 2999
Start Step-Time, activate ICM (Motor,
Valve), check for next-Step-Condition (Transition)
Setpoints:
DFM (Digital Function Module)
->
Setpoints, Timers, Decoders, Counter
Copy
an existing Recipe to a new one
Make
a new Master-Recipe
but
only the Header (first Page);
Press the button
 to
open the next window. Select Recipe-Category “Production”
and save it.
to
open the next window. Select Recipe-Category “Production”
and save it.
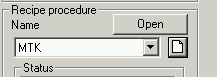
After
close select again the “Recipe-procedure” to MTK like
here:

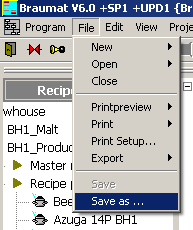
Save
and close the Recipe and select the Recipe-Status to “Released
for Test”
Then open
existing recipe and select “Save as” to the new recipe
(at the end of the list) Save; Close Recipe and open again.
Making a new Recipe
First
go to Parameterization Sequencer
Define
your Sequence-Name
Manual
Group (Sequence 1 = Manual group 1 for example)
Time_Rel
(Flag for Monitoring-Time f.e. M 1.0; Enable the Timer used in
FB1001… for to enable the Monitoring-Time)
Set
the BA_Year to “0”
Go
to Parameterization DFM0.1
Define one counter (Name = Counter) with Art=0 and Increment of
1
Go
to Parameterization DFM1.1 and DFM 1.2
Define one DFM1.1 for Time
(Data-Set-Name) with Art=1 Up-Counter
Divider = 6 (all 6
seconds)
QBit: M 10.0 Enable the Timer used in FC1001…
for to enable the Time)
Define
one DFM1.2 for Setpoint
(Data-Set-Name = Level) with Art=4 Limit-Value
PSK = 5
for Hysteresis of 5
QDat: AIN,1, XIST: Source actual
value of Analog In 4
Select
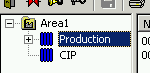
Basic-Menu Process-Administration, Recipe,
Right click on RCAT1
Rename
to Production
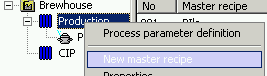
Right
click on Production

Select:
New Master Recipe or double-click on a existing one
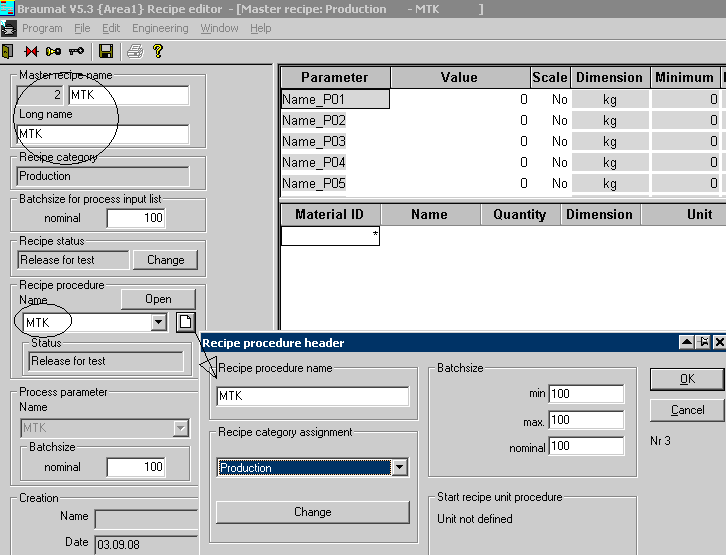
In
the next Window make the Settings for a new Recipe like this
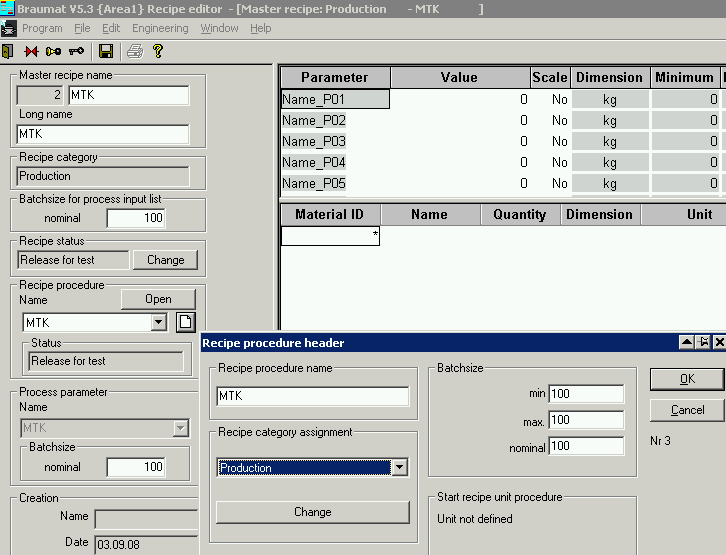
Press
the button
to
open the next window. Select Recipe-Category “Production”
and save it.
After
close select again the “Recipe-procedure” to MTK like
here:
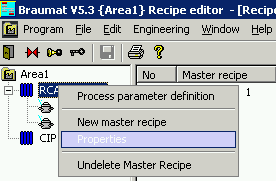
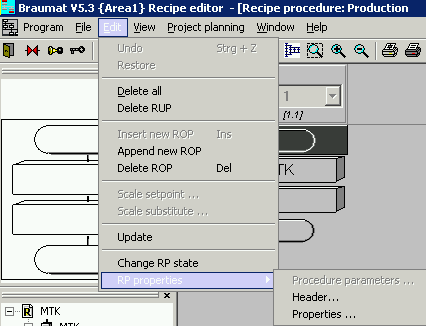
Then
open the Recipe, a window will Pop up or you have to Select Edit,,
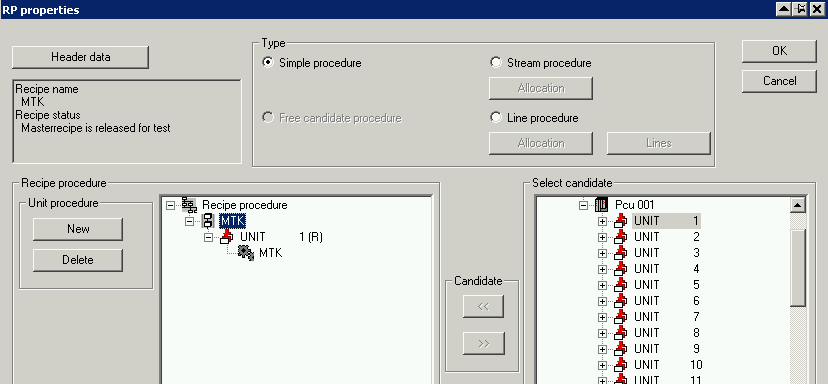
RP-Properties, Properties:
Select
New and enter “MTK”;
Then
click on the lift Side MTK and on the Right side Unit 1.
Put
the candidate by << to left and press ok.
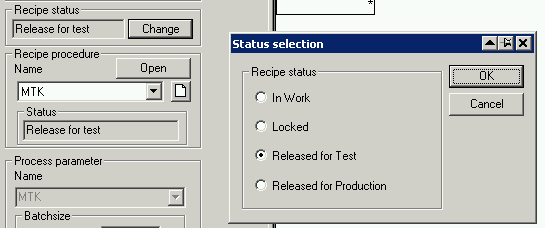
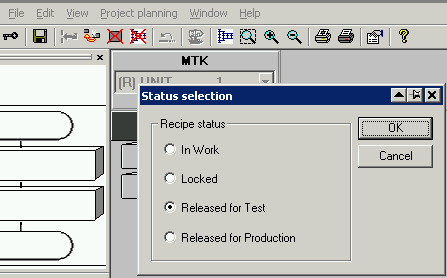
Select
Edit, change RP-Status and select Released for Test
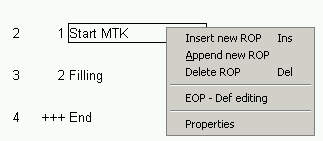
Then
select Edit and Append new ROP, Select “Start” if it is
possible
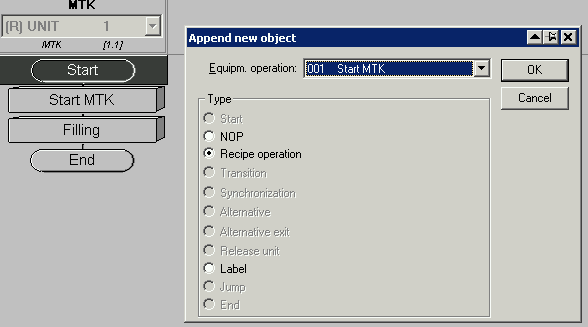
If
there is a NOP-Operation on Top, double click on it and select
“Start”
Select
the last Step, then again “Append new ROP”
Select
Recipe-Operation 1 (1.EOP Refers to FC1001)
Select
the last Step, then again “Append new ROP”
Select
Recipe-Operation 2 (2.EOP Refers to FC1002)
Select
the last Step then again “Append new ROP” End
Delete
with right click what you do not need
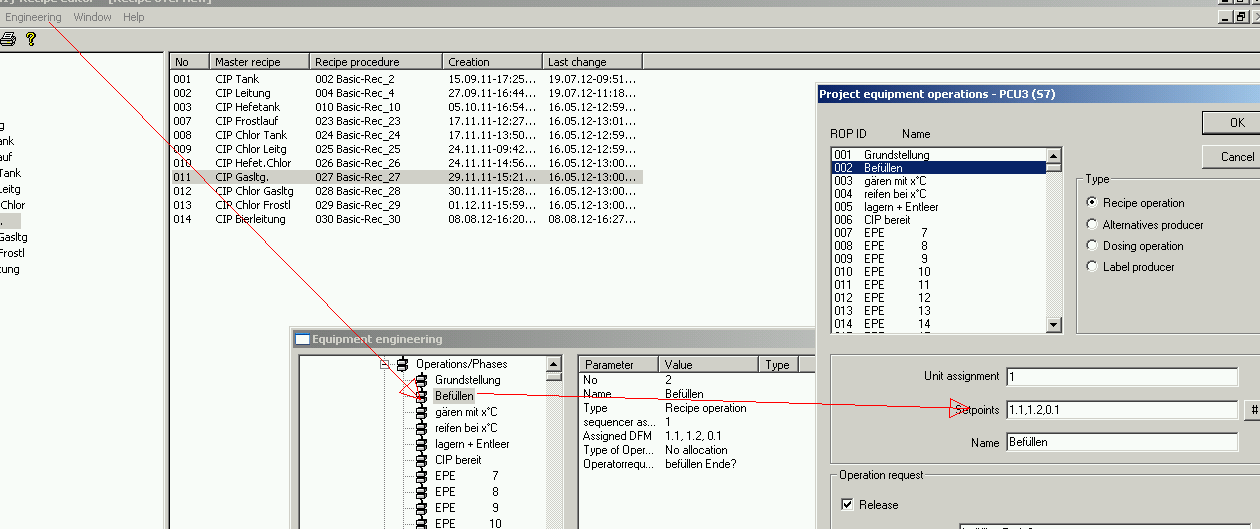
Then
right click on the ROP and select EOP-Def editing like this
Make
“Unit assignment” to 1 means Sequencer 1
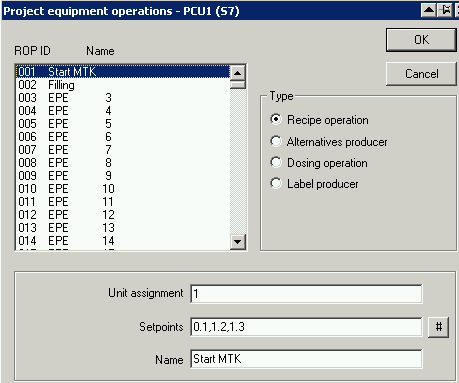
Press
“#” to select the according DFM 0.1 (Counter), DFM1.1
(Time) and DFM 1.2 (Level)
Give a Name for the Step “Start
MTK” for example
Do
the same for the following step “Filling” for example
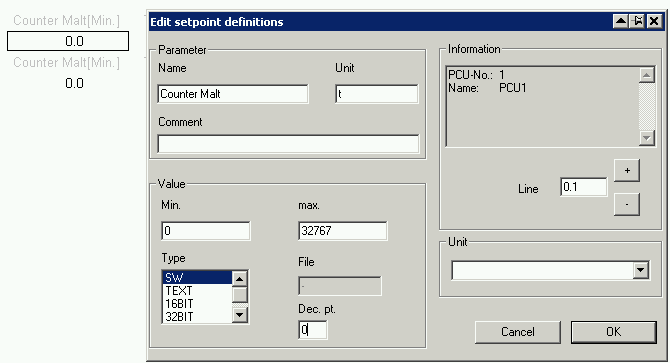
Right
click on the DFM in the Recipe and select “edit SP-Def”
Fill
the window like that for the counter and Time (Dec-pt = 1) and Temp
(Dec-pt = 1)
Save
and close the Recipe and select the Recipe-Status to “Released
for Test”
Save
and exit Recipe-Editor
Go
with the Explorer to d:\windcs\PCU.001\recipe\Sequence.ini
and
open Sequence.ini and Assign Sequence 001 to RecType 1 (Category from
the Recipe Editor) and Save.
Do no forget to do the same for new
Sequences!
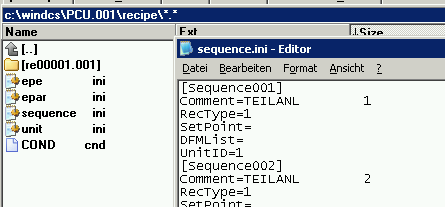
RecType
corresponds to the “1” for Production and “2”
for CIP for Example (see below)
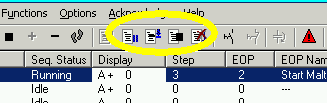
Go
in the Basic-Menu to Process-Monitoring and Sequence-Control
Press
the start-Button for the according Sequence 1
Enter
Batch-Number and Ordernumber and select your Recipe (Masching)
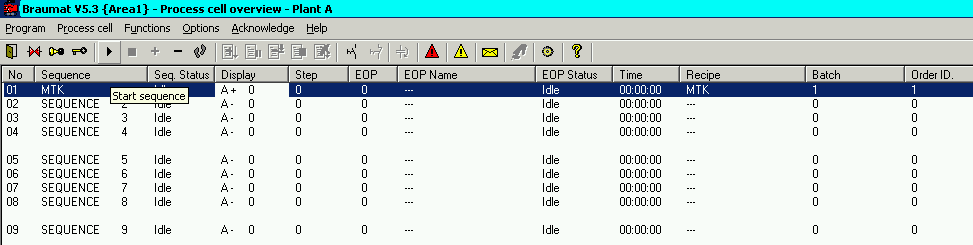
You
can modify the list for the Sequence at Functions, Edit Process Cell
view
1
1 means PCU Nr. 1, Sequence-Nr 1
1
2 means PCU Nr. 1, Sequence-Nr 2
You
can make groups in the File Functions, , Edit Process Cell
(Bereich.txt)
If
you want to define Process-Parameters
Right
click on on the Recipe-Category “Production” and select
Process parameter definition

Then
select the DFM’s you need and shift them to the right side!
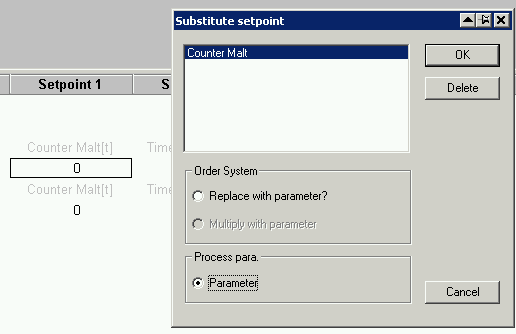
Then
right-click on the DFM in the Recipe and select Substitute Setpoint
and Process-Parameter.
But
to Start the Recipe the Setpoint should be > 0!
Order-System-Setup:
Open
the batch-scheduler and select File Close
Then
Select Project-Planning, “Order-Types”
Move
what is in the right Window to the left and Edit Production on Top
Then
Select at “Recipe-Category” Production and shift it to
the right
Then
it looks like this:
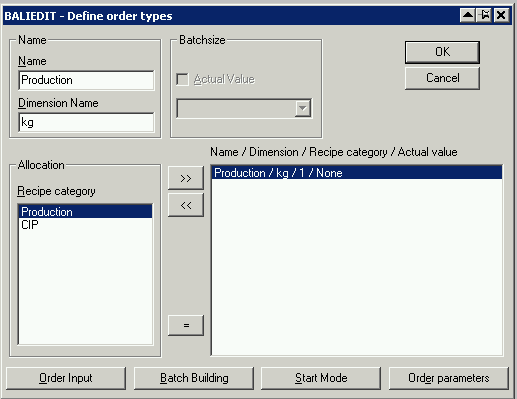
Now
you can select Order-Input etc. and Setup all Parameter!
At
Order-parameters you can select DFM’s which will be transferred
(the Setpoint by starting the Order-System) to the Recipe (select
Substitute Order-Parameter in the Recipe)
Close
the Window, and Select Edit, “new Order” and Select the
Recipe.
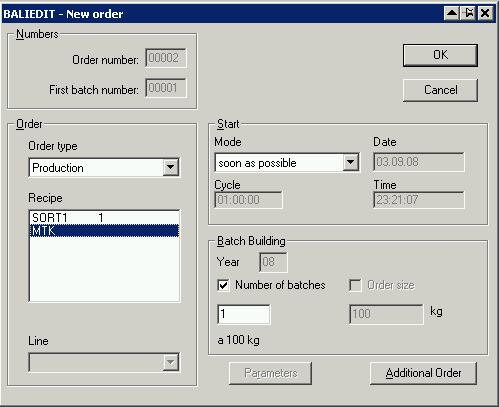
After
you press ok, you have the Recipe in the List.
You
can select it and release it, the Sequence will be started!
Here
we go!
online-recipe
for
to see recipe online (key F9 in sequence-overview or from the
faceplate) you need to define the Recipe-Type in the order system
Open
the batch-scheduler and select File Close
Then
Select Project-Planning, “Order-Types”
Move
what is in the right Window to the left and Edit Production on Top
Then
Select at “Recipe-Category” Production and shift it to
the right
Then
it looks like this:
Now
you can select Order-Input etc. and Setup all Parameter!
Program-Structure
FB1200
Cold Restart (never make a cold restart, all Parameters will be
deleted!)
FB1201
Warm Restart (here you program pre-setting-values)
OB1
Call
FB1220
Braumat-Code
Call
FB1221
BE
OB35
(100 ms)
Call
FB1222
Call
FB1224 User-FC/FB (f.e. Call FC 410)
Braumat-Code
Call
FB1223
BE
All
1-Second
FB1225
Unit-related
(1 second)
FB1001
Unit 1
FB1002
Unit 2
FB1003
Unit 3
FB1004
Unit 4
….
FB1064
Unit 64
Steps
(GOPS)
FC1001,
1001, Step 1,2 ....
Interlock
FB1226…FB1233
Free
Protocol
Make
a description of your Dbase-File in File FRPROT\FEPR_DEF.DEF
424
1
AUFTR_NR CINT 5 Auftrags-Nr.
6
CHARG_NR CINT 5 Chargen-Nr.
11
SZ_JAHR CINT 2 Startzeit Jahr
13
SZ_MONAT CINT 2 Startzeit Monat
15
SZ_TAG CINT 2 Startzeit Tag
17
SZ_STUNDE CINT 2 Startzeit Stunde
19
SZ_MINUTE CINT 2 Startzeit Minute
21
SZ_SEKUNDE CINT 2 Startzeit Sekunde
23
REZ_TYP CHAR 16 Rezepttyp-Name
39
REZEPT CHAR 16 Rezept-Name
55
TEILTEL CINT 6 Teiltelegramm-Nr.
61
BEDIENER CHAR 16 [1,1,0,1,"bedien.txt"]
//PCU1,Tt.1,1.DW, 1 Dataword
77
SORTE_1 CHAR 16 [1,1,1,1,"sort1.txt"] //PCU1,Tt.1,
2.DW, 1 Dataword
93
SORTE_2 CHAR 16 [1,1,2,1,"sort1.txt"] //PCU1,Tt.1,
3.DW, 1 Dataword
109
SORTE_3 CHAR 16 [1,1,3,1,"sort1.txt"] //PCU1,Tt.1,
4.DW, 1 Dataword
125
DATEN1_5 CINT 6 [1,1,4,1] //PCU1,Tt.1, 5.DW, 1
Dataword
131
DATUM_S1 CHAR 16 [1,2,0,3,"DT1"] //PCU1,Tt.2, 1.DW, 3
Dataword
147
DATUM_S2 CHAR 16 [1,3,0,3,"DT1"] PCU1,Tt.3,DW21
163
DATUM_S3 CHAR 16 [1,4,0,3,"DT1"] PCU1,Tt.4,DW31
179
START_ANS CHAR 16 [1,5,0,3,"DT1"] PCU1,Tt.5,DW41
195
START_FIL CHAR 16 [1,6,0,3,"DT1"] PCU1,Tt.6,DW51
211
ENDE_FIL CHAR 16 [1,7,0,3,"DT1"] PCU1,Tt.7,DW61
227
START_VL CHAR 16 [1,8,0,3,"DT1"] PCU1,Tt.8,DW71
Etc
call
the FB580 for to Transfer the Data
CALL
FB 580, DB580
iPartTeleNr:=1
(here for next Block 2,3...)
iBatch
:=0 //Batch Data is coming from the current Data-Set
iOrder
:=0
iRecipe
:=0
iRecType
:=0
iDataDest
:=1 //1. Dataword (-1=5DW)
iFunction
:=7 // Function = 7, that is load block data word
block
iANA
:=0
rRealInput
:=0.000000e+000
iDBNr
:=10 //DB-Number
iStartDW
:=1 //Dataword
boRetVal
:=M2000.0 //Error return value; 0: no error; 1: Error
next
Data-Wort, max 5!
CALL
FB 580, DB580
iPartTeleNr:=1
(here for next Block 2,3...)
iBatch
:=0 //Batch Data is coming from the current Data-Set
iOrder
:=0
iRecipe
:=0
iRecType
:=0
iDataDest
:=2 //2. Datenwort (-1=5DW)
iFunction
:=7 // Function = 7, that is load block data word
block
iANA
:=0
rRealInput
:=0.000000e+000
iDBNr
:=10 //DB-Number
iStartDW
:=3 //Dataword
boRetVal
:=M2000.0 //Error return value; 0: no error; 1: Error
….more
till max 5 Dataword
then
send it to IOS
CALL
FB 580, DB580 //send Data
iPartTeleNr:=1
iBatch
:=0
iOrder
:=0
iRecipe
:=0
iRecType
:=0
iDataDest
:=0
iFunction
:=0
iANA
:=0
rRealInput
:=0.000000e+000
iDBNr
:=0
iStartDW :=0
boRetVal :=M2000.0
==============================
Telegram
6 must be enabled in a FIFO 1 and 4
The
according DEF file must be defined in "windcs\sys\protdida.txt"
(you can take the preset values)
The
definition files must be created in "windcs\frprot" (see
section 2.7).
Fepr_xxx.def
xxx = recipe type (range = 1 to 255)
You can copy and edit the
fepr_def.def template file.
You
can have several different Protocols, depending from the
recipe-type, defined in windcs\sys\protdida.txt
For
making a Layout with MS-Access you need a full version of Access.
For
the Client to view the Data, the freeware Access runtime can be used.
Call
the MSI setup file from CD for to install Access runtime for
evaluation:
‘...\sis_sys.53\SISTAR.530_V0503xxxx\MicrosoftMS_AccessRuntime_Office_2003\Accessrt.msi’.
More
Hints
1.1Activate the S88-Commando:
Change in
c:\windcs\sys\seqctrl.ini: [MainWin]; EOPAdmin=255 and restart
Braumat.
Very nice Buttons specially the right makes “Step
+ 1”, sometimes useful.
Activate
Change Protocol
With
change protocol, all activities on the IOS are logged (change value
etc)
change in file
wincds\sys\PCU_SERV.ini
at [Recipeserver(&SoftCP)]
add
globlog.dll
like
this
Ports=ta.dll,s7.dll,h1_ndis.dll,recctrl.dll,balidata.dll,cas.dll,client.dll,globlog.dll
Change
in logging.ini:
EnableGlobalLogging=1.
change
here:
And
then it works only on the recipe-Server!
Trend
Export to text-File
In
Kurven.ini under Select:
_trace=1;
_Tracemode=A;
_traceval=1;
_tracevalmode=A (or W)
Then
in Folder \Tmp
kurven1.txt…
Data are generated when the Trend-Picture is opened.
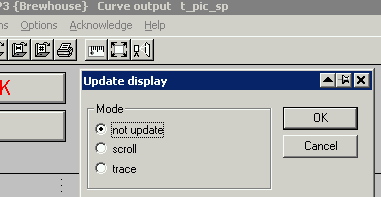
But
in Curves the Switch must be in "Options, Display Mode, not
update”
Changing
the Menu, Add new Functions
In
Texte.10\Menuv460.ini;
But you have to change the number on Top
as well
1.2Starting Programs Time-Planned or at the beginning (f.e.
Trendmanager)
In
PCU_Serv.ini search and change to
;Start
and Check for running of ProcessScheduler "ProSched.exe"
RunProcessScheduler=1
Then
modify windcs\sys\ProSched.ini
[Global]
Processes=trendman
[trendman]
Application=d:\windcs\sys\trendman.exe
;Start
this application if not running and check for
running
Type=PERMANENT
;At
own shutdown, shutdown altough this application
ShutDown=1
1.3Trigger the curves
Declare
measured value in "Trending definition"
Chose
iID is 54 for FB1054 and 59 for FB1059 but take care that this
GroupID is not yet used by others.
Restart
the Trend manager only or restart Braumat completely.
Then
write codes in FB1054 (cip Filler, sequence 54) and in FB1059 (cip
Filter, sequence 59)
Start and Stop of Curves
Call
the FC 695 for
Start of Logging
and this for
Stop of logging
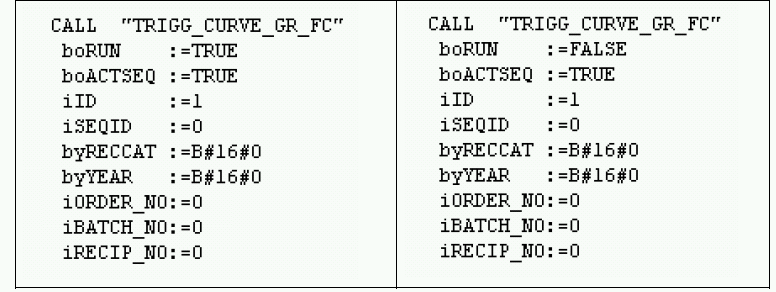
but
just once with a Flag (M102.2 or M102.3); ID = Group-Number.
So
just put this to the Sequencer-FB:
CALL
"TRIGG_CURVE_GR_FC"
boRUN
:="SEQU_Run" //M 102.1
boACTSEQ
:=TRUE
iID
:=xy //curve-group
iSEQID
:=0
byRECCAT
:=B#16#0
byYEAR
:=B#16#0
iORDER_NO:=0
iBATCH_NO:=0
iRECIP_NO:=0
Then
make a Trend-image and select according values
Some
information about setting up a Server or a Client.
Install
Braumat from the CD on a new Server or Client (on C:\ or D:\-Drive
or other)
Copy
a running Windcs-Folder to \Windcs (overwrite all!) or just rename
the original one and copy all \Windcs.
To
register OCX call c:\windcs\sys\ocx\ register.bat
Adapt
in c:\windcs\sys\trendman.ini if C:\Drive: 4$\\PC-Name\C\WINDCS
or
D:\Drive 4$\\PC-Name\D\WINDCS.
Start
Braumat and go to Administration, Configuration and change the
Site-Configuration, especially the name of your PC
Select
in the PCU-Server whether it is a Server or Client.
Restart
Braumat.
To
change Windcs from D:\
to C:\ or reverse
change in Windows, System-Settings, System, Advanced,
Enviroment-Variables, select down “Path” in the List and
“Edit”. Change C:\WINDCS\SYS to D:\WINDCS\SYS or reverse.
Then
go to the windows-Directory search the file win.ini, open it and
search Windcs and
change
C:\WINDCS\SYS
to D:\WINDCS\SYS
or reverse.
Restart
Braumat.
To
activate the
Demo-Version
Copy
c:\windcs\sys\PROD_DLL\ PROD32.DLL to c:\windcs\sys
After
8 hours you need a restart of Braumat. But there is not a message,
the functions do not work any more.
How
to Stop Braumat
and all the Services in the background (to rename the directory
Windcs for example)?
Call
c:\windcs\sys\terminator.exe
How
to extend the number of Instances (for example Analogue Input)
Extend
the DB to the according number of Data-Set by -Manager -Manager and
download. If there is already a Parameterization, save the content
first with the Excel-Productivity-Tool (after a upload of the DB).
Change
the number of Instances in the DB online and offline.
Change
the number of Instances in the files
c:\windcs\param.pcu\PARAMS7.010
for English S88
c:\windcs\param.pcu\PARAMS7.001
for English
c:\windcs\param.pcu\PARAMS7.000
for German
Here
a example for the 3 Step-controller:
object
ThreStep=DB744; (*Three-position controller*)
CID=CID_DREIP;
max=96->change
to 128 for example
offset=300;
Fast
ICM (50/100/200 msec)
In
order to have a fast ICM with 100 ms Cycle-Time for Feedback and
Output call
Call
FC727 with ICM-Number in the FB1224
iMode
:= 35 (35=OB35 = 100 ms, 36=OB36 = 50 ms, 34=OB34 = 200
ms)
V7:
FB1230: 200 ms
FB
1231: 500 ms
For
PCUs <V7, the synchronization errors resulting from direct calls
from the operating blocks
OB33
and OB34 have to be unmasked according to the following PCU
configuration:
AUF
"SYS"
Call
SFC 36 (Quittungsfehler ausblenden)
PRGFLT_SET_MASK
:= DBD160
ACCFLT_SET_MASK
:= DBD164
RET_VAL
:=#iRetVal
PRGFLT_MASKED
:= DBD168
ACCFLT_MASKED
:= DBD172
CALL
FC727 (...)
If
an extra ICM call is removed, you will have to use the application
"Parameterization" to switch
back
the ICM to cycle time in seconds:
● Set
hidden attribute "T100MS" = 0.
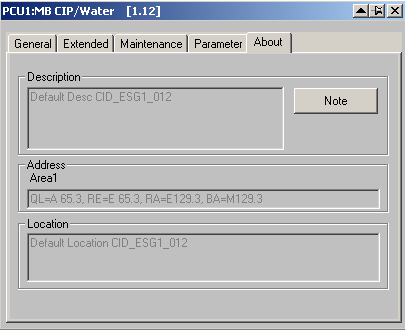
More
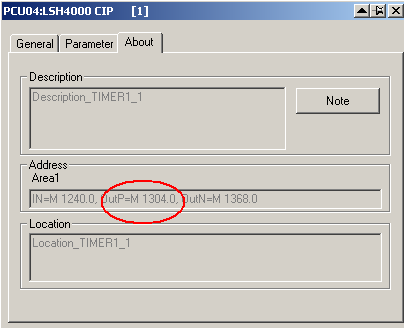
Information in the faceplates
In
the tab "About" configured information is displayed
(Description, address, location).
This can be defined in the
folders \windcs\pcu.00x\ Desc.10 and :\windcs\pcu.00x\Location.10 and
:\windcs\pcu.00x\Address.10
ESG 1+2 for the ICM faceplate
Mess
for the Analogue faceplate
Set
all ICM to Simulation Feedback
Write
AFFE (Hex) to DB701, DW10.
Simulation
with AFFE in DB701 does switch off transfer to the Output DB605.
Cross-Communication
with Braumat
Define
in Netpro the Links for PCU1 for example

For
PCU 2

And
for PCU 3

Set
the PCU with the higher number to active.
Download
Netpro to all machines
Now
you need to setup the cross-communication in the Parameterization
“XC_PCU_32”
.
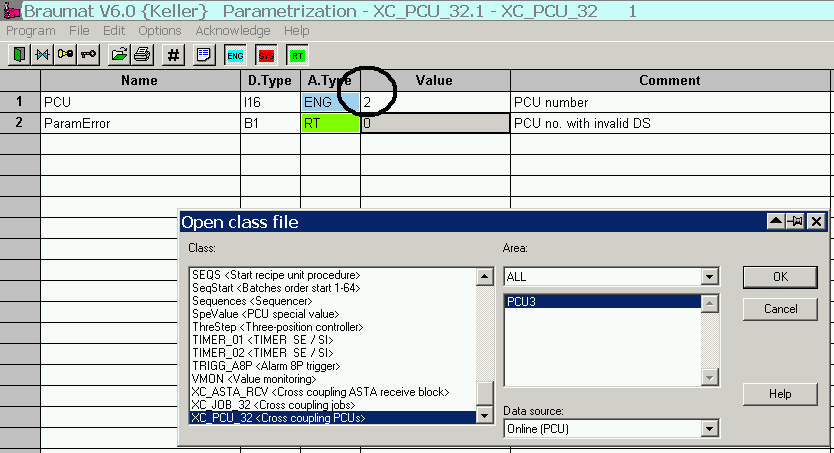
Where
as number “2” is the number of the Partner PCU (adapt to
your configuration).
You
need to make this definition in both PCU.
Then
go to XC_JOB_32 and fill the PCU-number, GET or PUT, and all the
other data like in here:
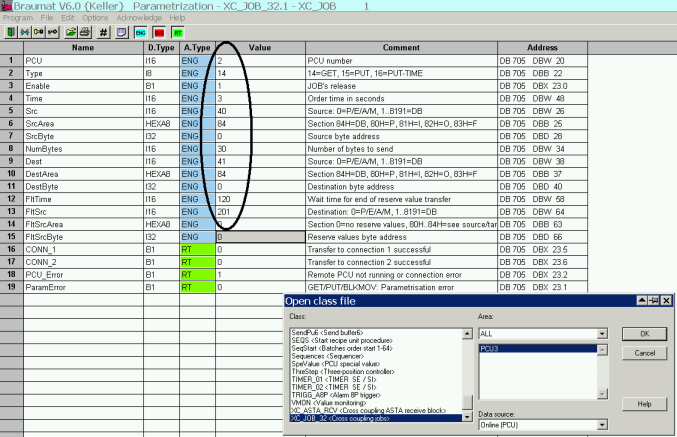
in
this example. Get from PCU 2 DB40, starting from byte “0”
30 bytes to DB41, DW0, all 3 second.
You
need to make this definition only on one PCU.
If
you have problems, restart the S7-CPU
1.4Making a new Structure (new function) in the Parameterization
Look
in c:\windcs\param.pcu\optionen\PARAMUSR.PCU for an example.
Copy
your File name.pcu to the according PCU-Directory. \PCU.00x
To
evaluate set parameter in \sys\om.ini
;Show
OMs tracing dialog at the beginning (1) or don't show om-dialog (0)
bTracingDialog=1
;Tracing
is enabled (only used if bTracingDialog=1) (1) or disabled (0)
bTracingOn=1
and
reset if finished.
In
V7 these objects need this header
object
AIN_ext=DB727;(*Measuring value*)
CID=2001;
max=512;
offset=300;
length=108;
number=DBW8;
filename=mess;
classtype=1;
version=0x08000000;
the
last 2 lines are new!
Here
in the manual you find more information about the feature:
1.5New Message-class with values
For
user-specific messages, a separate alarm-module is available that can
be supplied with additional values.
Input
the Message-Text in MELDUSR.TXT. Call FC713
More
settings in \WINDCS\SYS\MELDCLASS.INI
Search
for FC713 in the manual for more information
1.6Finish Windows-Shell and return to Braumat
Call
\Windcs\sys\EndExpl.exe
1.7Making an automatic Backup of the S7 to Braumat
C:\Windcs\sys\TRANSBST.EXE
/u:upload
in
c:\windcs\TRANS\upload.trs are all files to be backed up
/U:<file
name> Upload with Config file <file name >
/D:<file
name> Download with Config file <file name >
/S Program
execution with hidden window
Example:
D:\Windcs\sys\TRANSBST.EXE /U:S7PCU001.trs
You
can trigger now this command with the Tool prosched.exe and
prosched.ini (look “Starting
Programs Time-Planned”)
1.8Messages on the client
Change
in PCU_serv.ini
[Remote]
;Show
messages of remote PCU-Servers
ShowRemoteMsg=1
1.9Having less Messages in the PCU_Server
Too
many Alarms prevent the Operator from locking to the Messages.
Here
you can filter messages:
In
Parameterization in Dis_MSG (Disable Messages) you can remove the
whole going-messages.
In
Parameterization in PCU_Gen with hidden attributes you have more
switches
1.10Filter Messages of certain PCU on IOS, no Alarm in Client-IOS
In
d:\windcs\sys\PCU_SERV.INI there are switches
;Messages
from this PCUs will not be displayed
NoMsg=5
means
send Messages of PCU 5
;List
of computers that are to receive telegrams of type x
7=IOS11
means
send Messages to Client 11
1.11Synchronize the Time on several PCU by a IOS < V7.0
Use
the function windcs\sys\transtime.exe with the transtime.ini-File and
input all PCU in the ini.file. With that function, you send the Time
from IOS to PCU.
Transtime
is activated by transtime.ini
Note:
Telegram type 7 should be deleted in the FIFOs of the according PCU
and also in Area.ini
It is also not practical to transfer
the time via PCU cross-coupling or to forward telegram 7 to other
IOSs on the IOS level using `pcuserv.ini’.
Starting
‚Transtime.exe’ via the PCU_Server and Scheduler
Contents
of ‚Pcu_serv.ini’:
[Pcu_serv]
;Start
and Check for running of ProcessScheduler "ProSched.exe"
RunProcessScheduler=1
Contents
of ‘ProSched.ini’ - TimeMaster
[Global]
Processes=TransTime
[TransTime]
Application=d:\windcs\sys\Transtime.exe
Type=PERMANENT
ShutDown=0
StartDay=81
StartTime=10:06:19
1.12Synchronisation of time between IOS < V7.0
Start
XNETTIME.exe on each relevant Server and Client. Modify the file
xnettime.ini with according Server. On the Time-server XNETTIME.exe
is not necessary.
Autostart
XNETTIME.exe using the Siteconfig-Tool or with the function
prosched.exe
Or
Use
the function net.exe time \\IOS0x /set/yes to get the time from the
Time-Server, whereas IOS0x is the name of the Time-Server.
In
all ‚Time – Slave' IOSs, the time and date are read
cyclically from a ‚Time – Master’ IOS via the
‚Net-Time’ protocol.
This
takes place with the Batch-File ‚Time.bat’, which is
called from BRAUMAT Scheduler ‚ProSched.exe’ in a
predefined time cycle:
Contents
of ‘Time.bat’:
@Echo
off
Net.exe
time \\<PCNameTimeMaster> /SET /YES
<PCNameTimeMaster>
should be replaced with the computer name of the ‚Time –
Master’ IOS.
The
associated call in ‘ProSched.ini’ for this is:
[Global]
Processes=Time,…
[Time]
Application=d:\windcs\sys\Time.bat
Type=HOURLY
ReqTime=00:10
;to be started each hour at xx:10
In
this case, 'Time.bat' is called hourly from 'ProSched.exe', at 10
minutes past every hour.
1.13The IOS01 computer clock is jumping about x minutes.
The
time in the PLC is different from the time in the IOS. You can
download the time by User-manager, Date Time.
Or
you remove the Time-synchro 7 in the Fifo in the Paramerization
“Fifo”, Global Value.
Time-Synchronization in Version >
V7.0
Select the App
“BM-Config”,
Braumat Basic configuration
Select “change system
time” to allow Braumat to change the System time!
Go to the
App Siteconfig
Select
on (Time)-Server (IOS01) and set this as "Time master" (it
will send Time to the PCU)
Select at all other
Server (also in other Area): Retrieve system time from Time
master
Select at all Clients:
Retrieve system time from Time master
Select at all PCU: Retrieve
system time from Time
master
Remove Telegram 7 in the
Fifo!
Link the other Areas by
Multi-Client-Functionality.
In order to have
Time-synchronization, you have to login as Braumat and not as
Administrator that it works.
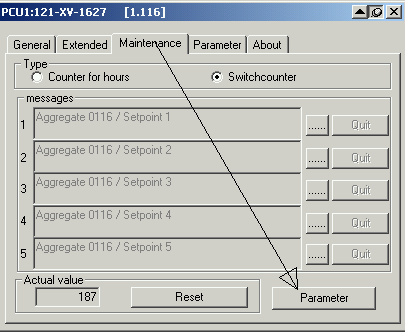
If
you want to use the Maintenance-Information (hrs-Counter,
switch-counter) and get an Alarm
Activate in the Configuration
Then
define a time in mainssupv.ini
There
are Alarm-Messages generated and additional files only with the
Maintenance-Alarms are stored in
.../Windcs/pcu.xxx/MAINT/maint_YYYY_MM/maint_YYYY_MM_DD.TXT
Very
useful for to verify what Unit needs maintenance!
1.14Installation on Windows 7
If
you install Braumat on Windows 7, you have to switch off UAC,
otherwise you will have problems.
How?
Make a command-line (Start, execute) and input UAC. Then switch it
off by putting the slider completely down. Then install Braumat.
More
on here:
http://windows.microsoft.com/en-US/windows7/Turn-User-Account-Control-on-or-off
Ok,
if you have Ultimate Edition or Enterprise Edition of Windows 7
you can install Vietnamese language and get Braumat run in that
language as well (see attachment how it looks), supposed your first
Windows 7 was English.
Free
download of language-packs under
http://windows.microsoft.com/en-US/windows/downloads/languages-xp
1.15How do I map different ICM assignment (inputs / outputs)?
Sometimes
it is necessary to deviate from the standard addressing (ICM 1.1 = I
64.0 E / Q 64.0). You have to do this
Different
inputs:
Open
the SIMATIC Manager, FC700, and change it as follows:

Map
at the marked point the input to the corresponding data in DB603.
The
original input can then be used elsewhere.
For
other ICM groups go to corresponding network 9, 13, 17
Do
not remove the BEU!
Different
outputs:
Open
the SIMATIC Manager, FC701, and change it as follows:
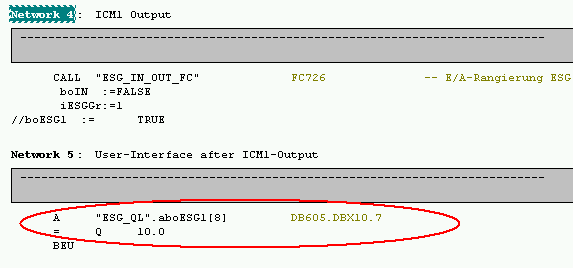
Map
at the marked point on the Output to the corresponding data in DB605.
The
original output can then NOT be used otherwise.
For
other ICM groups go to corresponding network 9, 13, 17
Do
not remove the BEU!
Version
7: This mapping can be done now direct in the Paramerization of ICM,
AVA, AOUT and TIMER.
1.16Start a process-picture or a application: userstart.exe
The
application userstart.exe allows you to start a
process-picture or any application with any IOS command
like changing a data word
Modify
the ‘USERSTART.INI’ Datei:
[IOS1]
;Data-Source
is PCU 1, DB709 DW 2.
DataSource
= 1,0,709,2
;StartApplication:
here you define the application in your case the Media Player
StartApplication
= C:\Program Files\Windows Media Player\wmplayer.exe
;StartList:
here you have the video-file in a text-file in the folder \windcs\sys
StartList
= files.txt
;termination-Button
beenden
= 1
;0
= no Alarm, 1 = MsgBox
ErrorHandling
= 1
;if
the pointer is wrong in DW2, take line 1 of text-file
Default
= 1
To
activate that function you can use prosched.ini-file
By
starting a window is opening with the corresponding data and
application.
1.17Engineering languages
The
engineering languages can be defined with the ‘SiteCfg’
Tool in the menu Area-plant settings. The plant texts are located in
‘…\windcs\PCU.nnn\texte\... for different languages.
Further information is given in the manual ‘02_Inst-Config.pdf’,
in subsections ‘Modifying factory settings’ as well as
‘PC definitions’.
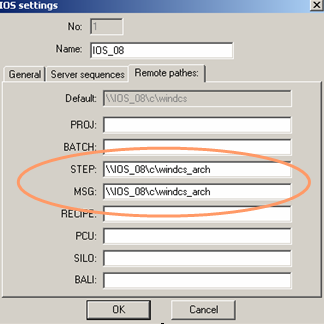
1.18Different location for archive - data
BRAUMAT
provides optional directories for different types of data.
The
remote path settings are managed in the “Configuration"
program.
If
you would like to change the default path “c:\windcs”
you can enter your
new path
via “Configuration” dialogue
Braumat
is not starting as a Recipe-Server, because one PCU is not present
You
can switch of recipe-Server-Function for the PCU not present in the
function Administration, Configuration:
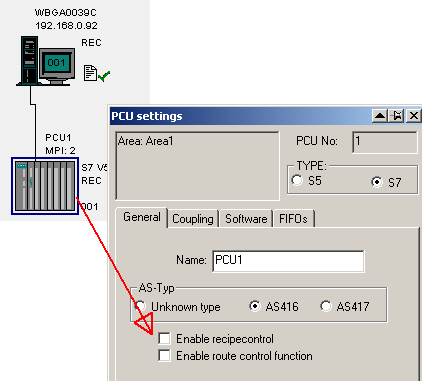
Restart
Braumat and it should work.
You
can integrate a S7-400 to Braumat without the need to have any
Braumat-Software in the PLC
You
can visualize all values in the Graphics and change them.
Integrate
a new S7-416 with the Function Administration, Configuration like
this:
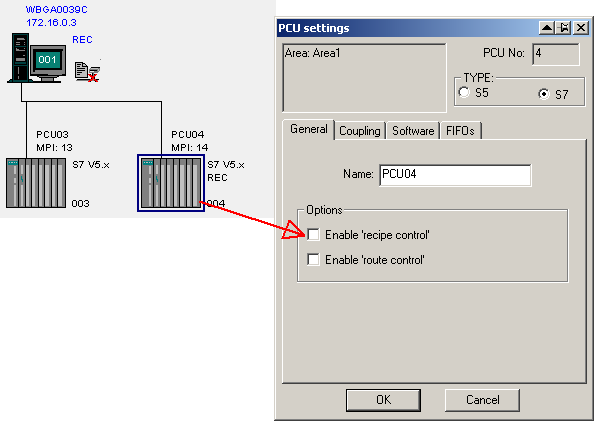
Then
open the file \windcs\sys\area.ini and write “Sistar=0 “to
the PCU S7_400
[PCU04]
Name=PCU04
EnableRecipeControl=0
Family=S7
IP_Addr=192.168.0.2
l2_addr=2
Sistar=0
SW_Recipe=V5
Communication
can be by Ethernet or MPI!
1.19How to make Braumat more save against Virus-Attacks
In
the Standard-Installation Braumat is not very save against
Virus-Attacks, because it is running with full Administrator-rights.
How
to change this?
You need SIMATIC Net as driver instead of
Soft-CP (is shipped with Simatic-Manager).
Remove the
Share from the complete drive and put a share only on \windcs and
\Temp and \Tmp.
Then
make a new User only with User-rights (not Administrator-rights).
Restart
with new User.
Version
7: Above mentioned
precautions are the standard in Braumat 7 now
1.20Minimum Safety-Interlocks
In
the FB1226…FB1233 (ICM-group 1,2..).
Minimum
is:
Inlet-Valve
of Tank closed if Tank is full
Pumps
must have open valve at the Inlet. If the valve is the outlet of the
Tank, check Low-Level sensor as well.
No
Steam-Heat-Exchanger on, if the Pump is not running.
Interlock
of Production and CIP (interlock the sequence with
Sequence-running-flag )
ON
M 657.7 SEQU016_ATS //CIP running for MTK
O
M 656.0 SEQU001_ATS //MTK is running allready
=
M 640.0 SEQU001_DB //MTK
More:
Switch
Valves delayed of if there is a pump for to avoid Pipe-noise.
CIP:
Switch next Step with conductivity delayed because it falls sometimes
and raises again.
CIP
Pre-Run: Take Fresh water if Staple-Water Tank is empty
CIP
Return: Go to Drain if the Tanks are full
1.21Analog Measurement-Values by ASI-Bus or other Profibus-Source
The
values can be transferred manually in FC700 End of Netzwork 21. to
DigitalVALPEW or DigitalVal.
1.22Braumat and Real (Version < 7.0)
Braumat
uses in most cases Integer, and you define the comma for the Output
(in the Graphics and recipe).
However
you can show Real in the Graphics with the function Val and then you
select real.
If
you get a Real-value from the Profibus PA for example, you can
transfer this value in this way to the Analogue Input:
//
AI xy from Profibus PA in Real
//
---------------------------------------------------------------------------
L
PID 512 // value from Hardware
L
1.000000e+001 //multiply with 10 to get one comma
*R
RND
T
"MESS".au[1].iDigValue // converted value
1.23Version 7: Much more REAL is possible in Version 7 in the
Parameterization
How
to make a backup of Braumat
Use
the Software “Totalcmd“ (www.ghisler.com)
it is more easy than with the Windows Explorer.
Make
a new folder Windcs_4_5_13 whereas the extension can be the date.
Mark
all (Ctrl + A) of \Windcs or the name of your project and Copy all
(F5) or copy, paste to the new folder.
You
will not have a problem, although the System is running.
If
you do not need the Archive-Data refrain from \FRPROT, \meld,
\SRPROT, \Trend, and \Logging and the file will be less big.
1.24Using the Backup Windcs instead of the running system
Start
c:\windcs\sys\Terminator.exe
Rename
the windcs-folder new to old and backup to Windcs.
Start
again
If
it does not work, restart the computer without Braumat as shell. Look
in the documentary how to remove the shell or use the tool “Autolog”
from www.braumat.de.
1.25More Analog-Switches delayed using the Modul VMON
VMON-Function
gives you 4 more analogue-switches each can be delayed, a very useful
tool. And you can compare 2 values.
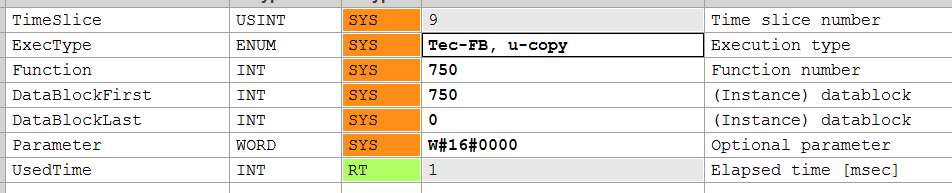
The block is disabled by
default. The block VMON (FB750) should be called from the scheduler.
The activation may be done in class “Schedule <Schedule
List>” in data record 54 or 60 set to enable. And Input
Function 750 and DB750 and Tec-FB, u-copy.
2How to improve the Performance of engineering
Engineering-costs
is a very sensitive issue. May be some of these hints help to improve
the speed of engineering.
Change
files directly
Braumat
is based on many text-files and Dbase-Files, which can be edited
manually very easy.
BUT
open this file
afterwards in Braumat-Textparameterization and save to have the right
format and for to synchronize on the other Server.
Change
of dBase-Files
For
the Dbase-Files you can use Excel, or the Total-Commander-plugin
“dbaseview.zip” (Freeware, also change the file with
that).
If
you change with Excel
(possible) take care not to change the column-width (you destroy the
file). And to extend, only insert new lines but not append!
Which
files are used for what?
For
recipe-Editing a lot of files are in \WINDCS\PCU.00x\recipe\. Or you
change something in the recipe or another application, and check with
Total-Commander “search file”, extended, not older than 1
minute…;
Also
the Text-Files in \WINDCS\PCU.00x\texte can be edited externally, but
to get them to the right format open them in Braumat and just save
them. In this case the Format will be checked.
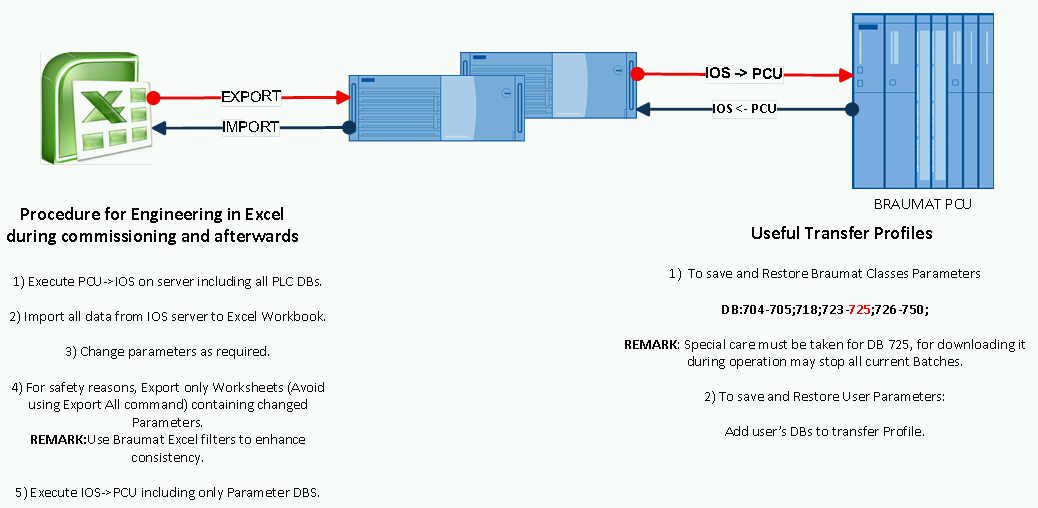
Braumat-Excel-Database
and Productivity-Tool
Using
the Braumat-Excel-Database from \WINDCS\EXCEL\ helps a lot to speed
up engineering and to work with several programmers at the same time.
But you need first to upload (if you have new Blocks in the PLC
already) the DB-Blocks from the PLC by the Application in
Administration, File-Transfer, PCU->IOS, DB709-750.
Then
you Start \WINDCS\EXCEL\macro.xls. Leave it open in the backround
Start
Start \WINDCS\EXCEL\Param_PCU00x.xls
Import
Data from Braumat by
pressing Alt + F8 or Extras, Macro, Macros. Import one Table.
Now
you can do your complete planning of the Plant (in the Folder
Sequences) and all Braumat Modules are available. Also for
recipe-system it is very useful and speeds up time a lot (Tab
epe.ini, epar.ini, sequence.ini). But take care if you Export it is
overwriting Recipe-parameters! So to be sure Import first to Excel.
Also
the Special-values (SpeValue) can be Setup here. I recommend to
Preset all values to “sec” and “KT” and
“2005” (5 sec) first.
Export
Data to Braumat by
pressing Alt + F8 or Extras, Macro, Macros. Export one Table.
Then
you need to download the Data to the PLC by the Application in
Administration, File-Transfer, IOS->PCU, DB709-750.
If
several programmers are working on a project, it helps also to
synchronize the Data if each Sequence has its own DB for necessary
fags.
How
to find the corresponding Flags for an ICM in the Screen?
You
have a easy access to all Braumat-Addresses of Input and ICM in here:
The
same in the Timer-Faceplate:
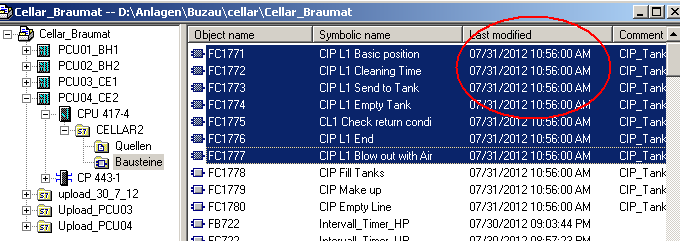
Simatic-Manager
Sort
the files in Simatic-Manager by “Last modified” and you
always have the last changed Block on top. But you need to remove
some column with “options, customize, columns” first.
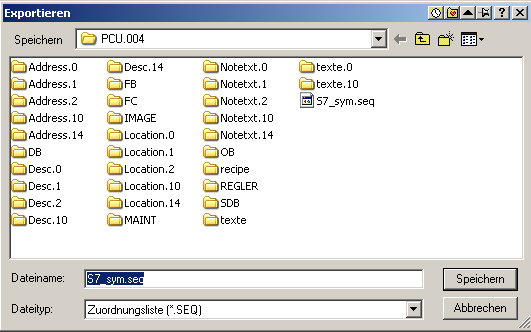
Export
Symbolic-List to a Textfile
You
can export the Symbolic-list (Simatic-Manager, Symbol-Table, Export
to *.seq-file), change (by Excel or Notepad++) and Import. But before
that you have to delete the complete Symbolic-File first (so make a
backup of the project first). And Import by Simatic-Manager,
Symbol-Table, Import). How many errors? Take care, also the warnings
will have effect so it should be 0 Error, 0 warnings!
Ok,
with Excel it is a bit different. Excel will remove the first column
if there is nothing. So write anything in the first column (new line
and put a x) before saving. You can remove the first line after that
with Notepad and Import to Simatic-Manager. Works fine!
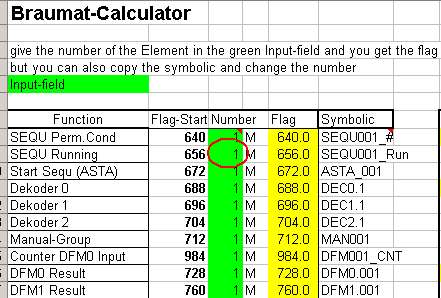
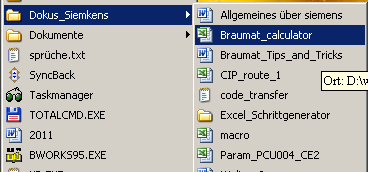
Braumat-Calculator
The
Braumat-Calculator (can get from me) helps also to find the according
address and DW very fast. Just Input the number of Sequence or DFM
and you get the according address.
More
Tools
Notepad++
is a amazing Freeware
where you have a lot of Tools to make Braumat-life more easy.
For
example “replace in Files” to replace a symbol in all
pictures
Or
the column-Mode to extract or change only some columns of the file
(Recipe-files like sequence.ini, epe.ini etc)
Or
you can records keystrokes and let them run many times and much more.
You
can easy copy Step7-Code to Notepad++ and change and copy back.
I
keep the Symbolic-List (located in \Windcs\PCU00x\s7_sym.seq allways
open in Notepad++ to find fast (Ctrl + F) the according Symbol /
Adres. Export from time to the Symbolic-List of the Simatic-Manager
to Braumat
You
can make a Desktop-Folder
with all the files (link) relevant for the project (xls…) and
shift them to the Start-Menu for fast access. Also “Last
Documents” of Windows (Start, Documents…) helps a lot.
If
more than one
programmer works on a
S7-Project, use DB.DBX for flags instead of the assignment-list for
better synchronisation. For example each Unit has it’s own DB.
Then you are free to synchronize easy.
Program
interlocks (full
vessel / empty vessel close according valve, pump on only if valves
are open etc) not in the program but in the Interlock FBs 1226-1233.
It saves code and makes the programming more transparent.
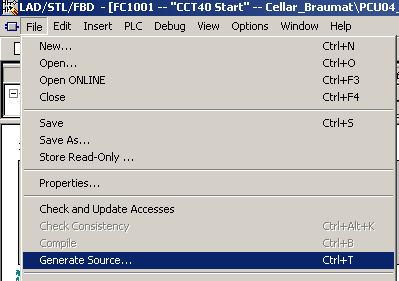
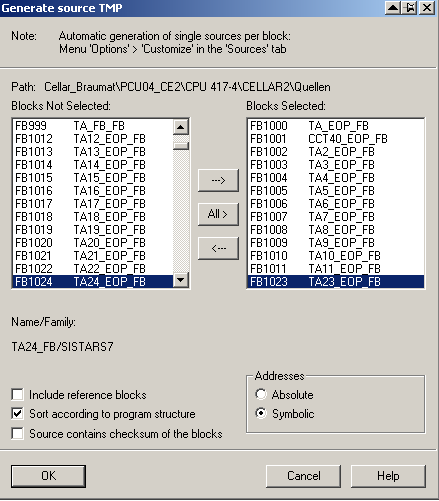
If
you have a new project but use the Software of another project
You
can speed up the engineering by generation the User-Blocks of the old
Project to Source in Symbolic (generate Source in Simatic-Manager,
but in Symbolic). Then change only the address in the Symbolic-table
to the new address and translate. Wow! All with the new addresses
now. After that you can also modify the symbolic in the list etc.
Good luck!
Export
Symbolic-List to Braumat
You
need to export the Symbolic-List if there have been many changes to
Braumat. You can
export the Symbolic-list (Simatic-Manager, Symbol-Table, Export to
*.seq-file) and save it to windcs\PCU00x\ with Name “s7_sym.seq”.
If
you have a language-depending engineering, you also need to export to
windcs\PCU00x\Texte.x
Synchronize
Symbolic-List with Braumat
You
have a very good Tool called S7-Symbols sync in Braumat to realize
this. You select the Modul you want to synchronize (ICM etc) and the
you see the differences. This works with the exported Symbolic-List
in windcs\PCU00x\ or windcs\PCU00x\Texte.x
2.1Replace Hard-Disk of PC
Backup:
Use Acronis-Boot-CD and a USB-Harddisk: Backup all Partitions you
need from the other Server.
Restore:
Use Acronis-Boot-CD and the USB-Harddisk: Restore all Partitions you
need.
Start
NewSID (Freeware from SYSINTERNALS) and change IP-Adress of the
Network
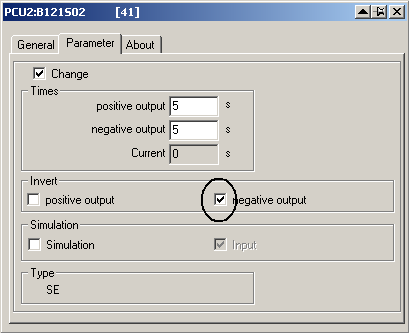
2.2Delay off-Signal of Timer
You
have a switch-off-Delay if you Invert the negative Output and check
for the negative Impulse.
2.3Full & Empty-Signals
Normally
Empty-Signal = 1 if sensor is covered, that means “0” if
empty
Normally
Full-Signal = 0 if sensor is covered, that means “0” if
full
2.4How to deactivate cross-communication?
Go
to XC_PCU_32 in the Parameters and remove the according PCU-number.
2.5How to get more Instances of a Class (e.g. PID etc.)?
If
you open Parametrization you have the number of ICM on global Data.
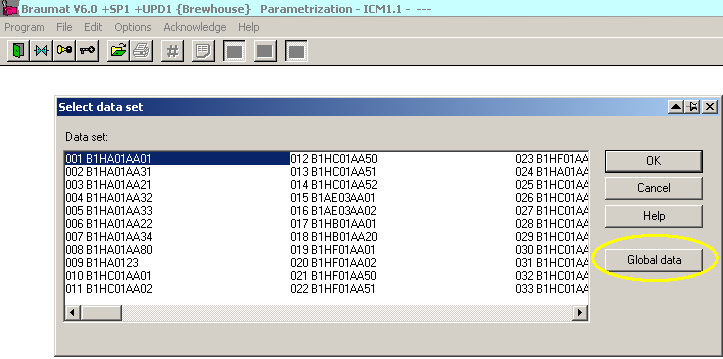
Here
you can extend the number of ICM, same for analogue etc.
Then
take a look in the manual for the according addresses or take my
Braumat-calculator
2.6Analogue-Values in Real
You
can get the Analogue-Values in Real by Loading "MESS".au[1].rXist
Also
the AFIX provides Real
Display
Real on Screen with the function VAL (Integer or real value)
Version
7: much more real is available.
2.7If a sequence should always run program like this
in
the according FB 100x (Network 2 or 3)
//start
Sequ if not started restart
AN
"SEQU_Run"
FP
M 30.0 //use one flag for impulse
SPBN
a001
R
"SEQ".u.STATUS.boMan
L
1
T
"SEQ".u.iNewStep
L
1 //check this in the Parameters!
T
"SEQ".u.byRecType
L
1 //check this in the Parameters!
T
"SEQ".u.iRecipe
L
37
T
"SEQ".u.iBatch
L
1234
T
"SEQ".u.iOrder
a001:
NOP 0
or
you use the SEQS (Sequence-Start) Type 4
AN
"SEQU_Run"
S
"ASTA_013"
A
"SEQU_Run"
R
"ASTA_013"
2.8Trends on Client
To
see trends on client modify the file \Windcs\sys\trendman.ini
Server=1$\\IOS01\D\Windcs
Whereas
IOS01 is the Server with the according curves
And
modify Client_noWrite=1
2.9Trending call in the process-Image
It
is possible to call the Trend-function from the process-picture by a
button. Most easy it can be done with week-curves, which is nice
because you do not need to select Batch and Order-Nr.
You
can make a week-trending picture and access the Batch-Trending Tags
as well. So you do not need to make extra definitions for a
week-archive.
This
is the function in Image Design using the function “PC-program
Start”
Kurven.exe p MTK1.ltb $BYEAS 0 $BORNS $BBANS
'MTK1-Trends'
or
like this: Kurven.exe c BH1 LT.ltw - -,0
For the symbol use a
Bitvariable linked to any flag for example this symbol: KURV_SYM.BMP

2.10A ICM generates an Alarm, because the Feedback is going away for
a short time (Seat flushing).
You
can avoid this if you Input in the Paramerization a time-value 0-15
sec at Error-Time in the Dataset. If you Input 4 you see 44, but
that’s because the second “4” is the actual value.
If
you want to know the Step-Number and Basic Operation number in the
GOP
Make
like this
T
#iStep //Step-No. of the sequence
TAK
T
#iBOP //Basic Operation number
Display
of “more Info” in the ICM-Faceplate
Y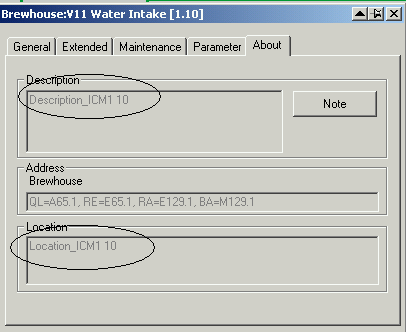 ou
can copy and paste the Symbolic of Step 7 for ICM to the Excel-Sheet
in \Windcs\Excel\ and Export. Take Folder ICM and column “Location”
and Description
ou
can copy and paste the Symbolic of Step 7 for ICM to the Excel-Sheet
in \Windcs\Excel\ and Export. Take Folder ICM and column “Location”
and Description
Max
number of windows
Can
be setup and should in the file \windcs\sys\sys.ini
;Maximum
account of SISTAR-Windows or 0, when there should be no limit
WndMax=8.
for example 8
Multi-Client-selection
windows is not popping up prior to start a applikation
Press
CTRL-key + application to get it back.
There
is a Message-window coming when I open a ICM-Faceplate
The
Error may occur due to the Maintenance-Database. How to solve it? Go
to the highest number of ICM in the Screen (or define one ICM 4.255
etc) and open that go to Maintenance, select Parameter and close.
And
then press “ok”. Better now?
2.11Read-only-PCU, no write to PCU
Change
in \Windcs\sys\Sys.ini in the according IOS
[Trans_NT]
;List
of "read only" PCUs
NoWrite=1,2
2.12Hold and Release in the process-Image
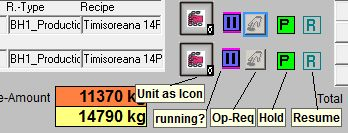
For
to display flashing Hold in the screen (may be next to
Sequence-Faceplate) select Flag R_Held of the Unit-Faceplate
For
to release from Hold show with another Button R_Restart-Flag of the
Unit. May be with Operator-Level “-1” to avoid a window
popping up.
For
to show whether there is a Stop of the Sequence show flag R_Running
of the Unit flashing
To
advise the Operator about necessary action, you can make another
symbol with flashing Operator-Request linked to Flag OpReq of the
Unit.
A separate Button for to show the Icon of the
Unit-Faceplate is very useful
In
the Software outside the Unit check for AN
"SEQ".au[x].CTRL.boHeld for the Held-Signal.
2.13Synchronization of 2 IOS takes too long
You
can modify the file d:\WINDCS\ETC\SYNCHRO.DEF to speed up
synchronization
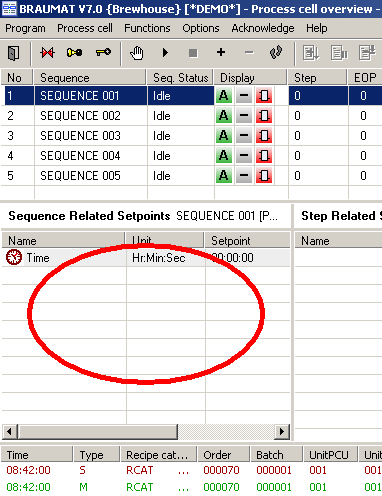
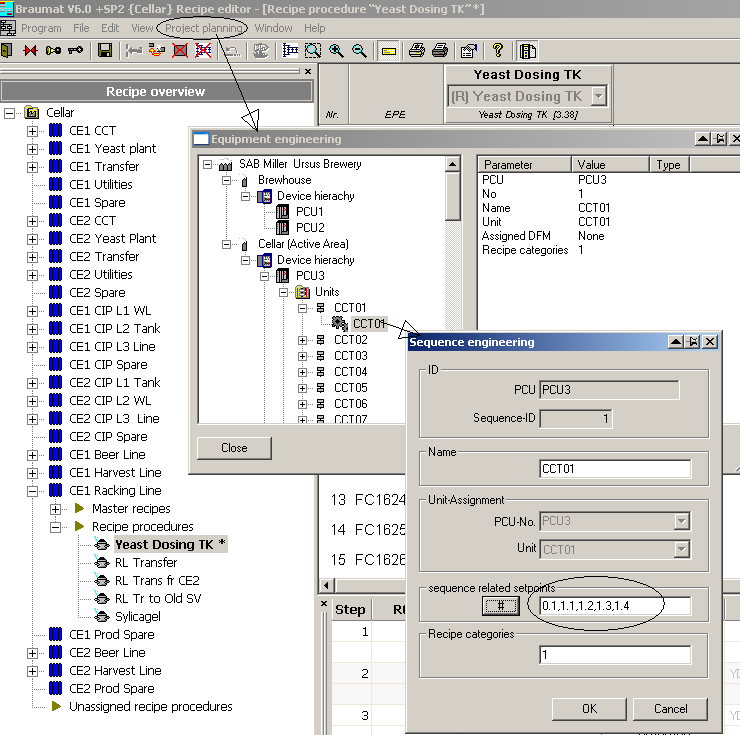
Setpoints
at the left side of the Sequences overview window
are
defined in Recipe, Project-Planning, Equipment-data,
Device-Hierarchy, Unit, open the “+” and then right
click. Here you can define what you want to see on the left side or
when the sequence is in Stop. Could be all Unit-related DFM.
2.14Changing the size of the Picture
The
size of the picture can be modified by the Tool “Image
Design-Sizer”.
Image
Design-Sizer is
integrated in the system. To
activate change in \windcs\sys\Image Design.ini [Options]
Image
DesignSizer = 1
Then
there is the feature is available in picture-construction, Tools
2.15Standard-Configuration for the Fifos
With
this Configuration, the Standards are activated:
Fifo
1 + 4 (=Server 1+2): 3+7
Fifo
2 + 5: In here System puts telegrams according to Recipe-Server,
don’t change!
Fifo
3 + 6 (=Server 1+2): 5+6+14+18
Configure
the Fifos for several configurations
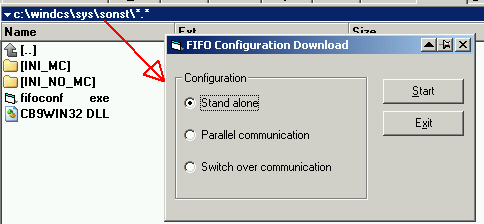
You
can use the File fifoconf.exe to do that.
2.16Copy Graphics to all relevant IOS
Switch
in \Windcs\sys\biko.ini
;Copy
files to all GP_PROJ paths after saving files
CopyFilesToAll=1
2.17If a Output(ICM) is not activated
Set
line 1 in ICM-Parameters to “0“. Sometimes it helps

2.18Add a new class in the Excel-Engineering-Sheet
If
you want to add a new class in the Excel-Engineering-Sheet
(Param_PCU001_1.xls) you can implement them very easy by yourself
(Braumat is a open system!).
Simply
make a new sheet, name it “Poly” or other name of the
Instance.
Copy
an existing content from another Instance.
Modify
the symbolic, names and presetting according the
Parameterization of the instance.
Names
must be correct, so maybe you copy from ParamS7.010 (or your
language-file).
Finished!
Already
you can import / export.
If you want to have it included in
“Import all, Export all”, then open
\Windcs\Excel\macro.xls; Macro, Modify.
Then extend the new
function to the list you see with the same parameters ,2 ,0).
If
you switch on the \sys\tracesvr.exe you will get Messages if there
are errors.
2.19How to integrate a new OCX in Braumat Image-Design
You
generate the Code by VB or Visual C or whatever.
Copy
the according GUID for this in \windcs\sys\ocx\sisctrls.ini
Like
that: Guilherme_special
;{D33A5C15-13FD-11D7-97E9-000476135A6D}
This
number is generated from Visual Studio and might be seen with the
according name in the registry Class_ID; That means you register it
and look in the registry for the according GUID. Or google for OCX
GUID
Then
you register the ocx with a batch like that:
regsvr32
/s Guilherme_special.ocx
Then
you integrate this OCX in Braumat with Image Design, Controls, add
any one, press button “others” and select your OCX.
For
communication to the PLC datalink.ocx is very useful, but not
supported any more although it is working fine.
2.20TCP/IP-connection between IOS is unstable
IP-Masks are
ok (255.255.255.0) and unique?
Is there a
Domain-Server? Does he work properly?
Are Firewalls
switched off?
The host-Table
(in c:\WINDOWS\system32\drivers\etc\hosts) can help in heterogeneous
networks to speed-up build of communication. BUT the file has to be
unique in the complete plant! Otherwise you will get strange
problems!
2.21Braumat with a PCU-H (417-4HT14-0AB0)
You have to
set the USE-CRC-flag in the Site-config if you are using just 1 PCU
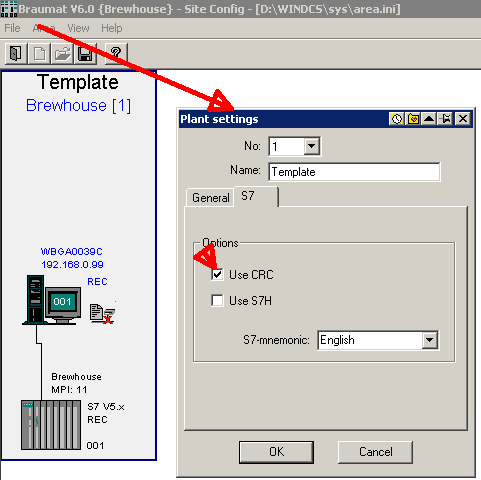
If you have 2
redundant CPU you have to assign “Use S7H“ as well.
2.22Switching between Braumat V5.x or V6.0 and V7
In the
System-Path of windows (System-settings, System, extended settings,
extended, Enviroment-Variable, Path) D:\windcs\sys has to be at the
beginning.
To activate
Braumat V6.0
Prior to start
Braumat V6.0 Start x:\Windcs\SYS\ocx\register.bat and start Braumat
V6.0
To activate
Braumat V7.0
Start
x:\Windcs\SYS\ocx\unreg.bat from Braumat V6.0
Rename \Windcs
to \_Windcs for example
Then Start
\Program Files\Siemens\Braumat\sys\register.bat and start Braumat
V7.0
And vice versa
to go to Braumat V6.x
New! For
Autostart of Braumat you have to Input in the Registry only
newmenu.exe without Windcs\sys!
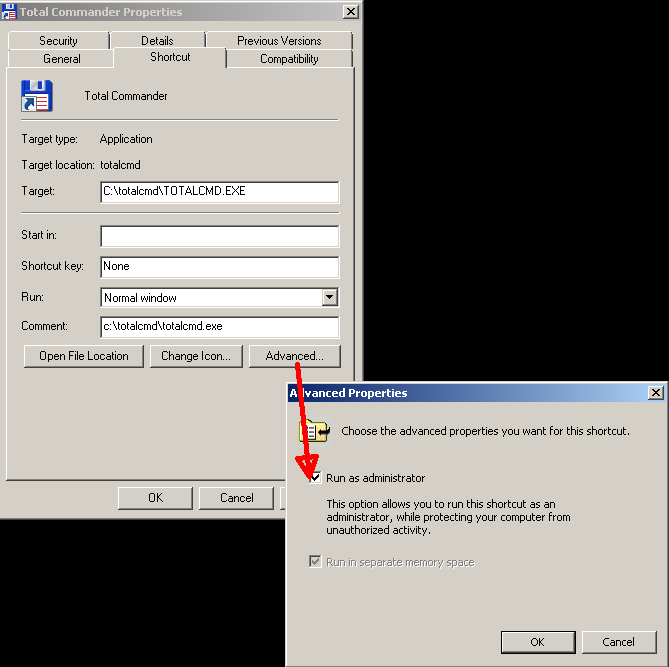
2.23Register OCX with Admin-Rights
For to
register OCX in Windows 7 call Total-commander in Admin-Mode
(Properties, Compatibility, Admin)
2.24Disable manual switch to the next Step for critical technical
configurations (V7.0)
In
case some steps are very critical (pressure cooking), manual change
of the Step could have disastrous consequences you can lock the
manual change of the Step with this switch.
Set
"SEQ".u.CTRL.xSuppressOpStepChange to “1”
No
manual change of the step is possible.
2.25Transfer Real to Analog Input
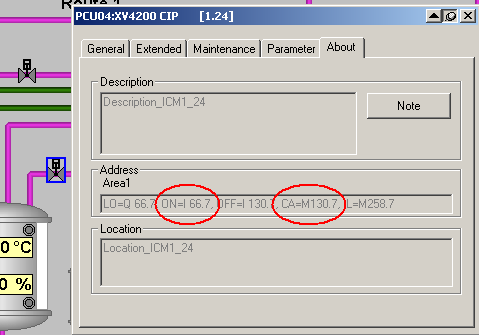
L
Real-value from Profibus
L
1.000000e+001
*R
RND
T
"MESS".au[1].iDigValue
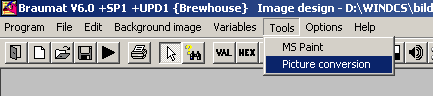
2.26Resize pictures .bik
Here
(above) you find also the Tool to resize pictures .bik “process
diagram conversion”
But
the background-picture *.bmp has to be resized manual.
2.27Material-Sequences
In
the recipe you have the function Material-Sequences. It is possible
to define only the successor. The predecessor is coming automatic
depending from the definition of the successor (f.e. after water all
material is possible)
2.28More hints for V7.0
You
have a Braumat-User-Account; Login with this name
When
login as Administrator no “synchro time” is possible.
Only when login as User
A
old Project can be converted to V7.0; the dll’s are deleted,
the Text is extended to 32 sign, recipe is adapted etc.
Windows
UAC can be on level 3.
1,7
MB of memory is now necessary, more than the CPU 414 can manage. The
BRL-Objects need a lot of memory!
Cross-communication
old-PCU and new is working.
In
the application siteconfig input the correct Software of the AS. It
can be a Version 4.6!
Enginnering-Lizens
is linked to one PC.
For
each PCU you need a Lizens-key on each Server
In
PCU-serv.ini you can adjust that 32 characters should be visible.
With
Unit -OCX you can also generate very individualistic Faceplate for
the Unit.
Lean
1 PCU, 1 Server 50% more cheap; A Client is possible
Changing
the Main-Menu can be done in \Program
Files\Siemens\Braumat\Texte.1\BM_AppCenter.ini
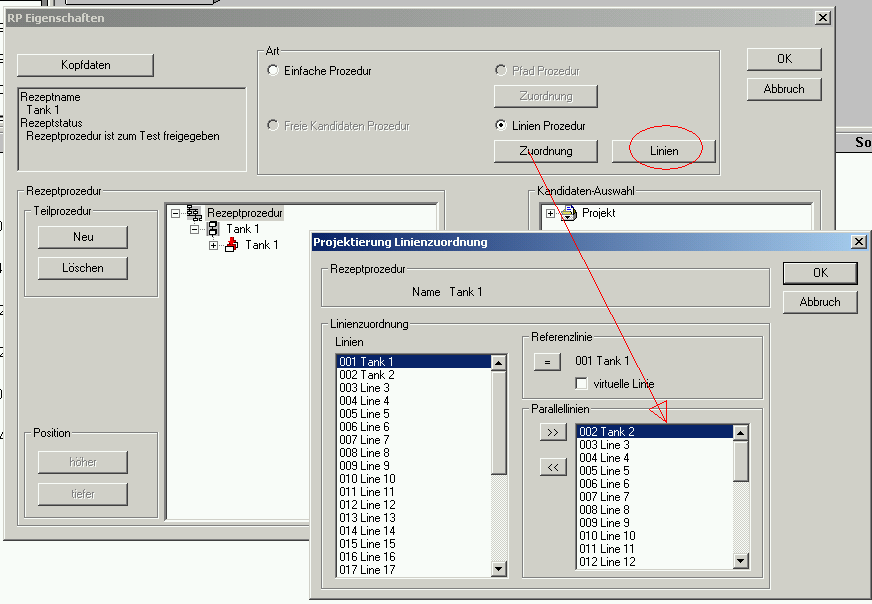
2.29Line-Recipe is very useful in the Tank-farm, if you have similar
Tanks.
For
that you have to modify the file
windcs\recipe\project\BOPASS.DBF
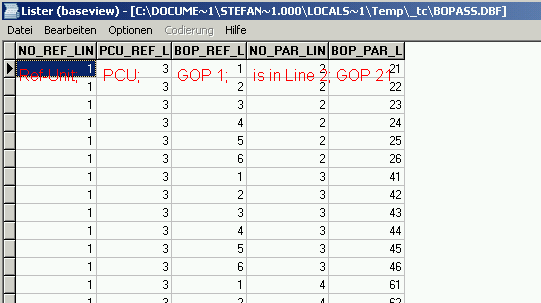
In
this case Unit 1 GOP 1 corresponds to Unit 2 GOP 21
In
this case Unit 1 GOP 2 corresponds to Unit 2 GOP 22
In
this case Unit 1 GOP 1 corresponds to Unit 3 GOP 41
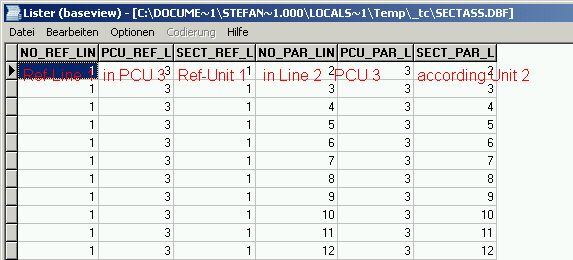
And
the file windcs\recipe\project\SECTASS.DBF
Then
you make for all relevant EOPs the DFM-Definition in the recipe
Then
you first Input the name of the Lines (Tank 1, 2…)
Then
you define a Reference-Line (Tank 1) and all the parallel Lines
You
Input only Recipe Tank 1.
When
saving all the other recipes are generated.
Good
luck!
3Triggering of “User step protocol” entries FC 771
To
enable a detailed evaluation of the recipe setpoints/actual values in
the step log tables of a connected SQL database at a later time, for
example, additional step telegrams can be triggered by calling the
new
FC
771 "BmTriggerUsrStepLogFC"
in
the EOP FCs or UNIT FBs at any time.
Cross-communication
If
it is not working restart PCU’s on both sides.
Here
one example for the configuration of Braumat of S7-connections
PCU
5
to
PCU 6: local ID 6; Partner ID 5; passive
PCU
6
to
PCU 5: local ID 5; Partner ID 6; active
Synchronize
process-images on all servers
Referees
to the file \Windcs\ETC\SYNCHRO.DEF and se in \sys\biko.ini
CopyFilesToAll=1
Start
the Step7-Simatic-Manager in Braumat for Transition-Diagnostics etc.
And
write it in the Application Status here for all PCU
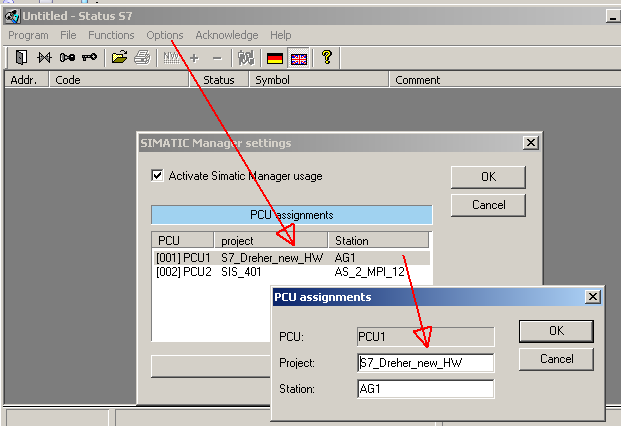
Change
in status.ini
[S7]
;Using
the KOP,FUP, AWL Editor of STEP7 for status diagnostic
UseStep7App=1
EnableStep7App=1
Keep
in mind that the client could change the code!
I
big blocks like FB1226 are monitored for Status, it takes a while
until they are opened.
Call
Step-7-Status Programm in picture
Specify
Programm-call in process-image with Status_S7.exe 3 FC153 1 (PCU,
Block Network).
Delay
Step-Time
In
the sequence a delay-step-Time can be defined in Unit-Parameter
Delay_SP (Param-Nr. 81); This is start at every now step and the
result is flag M 101.1 TVERZ.
Display
of the missing condition for the Transition or Interlock by color
In
order to have to Display of the missing condition for the Transition
or Interlock by color you have to set in status.ini
[Settings]
;Change
Color for Negativ-Status
SetColorText_Neg=1
Here
you can see the Transition with color, very useful!
And you can
call the graphical recipe as well.
Programming
Horn
O
M 99.4 //Alarm sequ
O
M 99.5 //Alarm ICM
O
M 99.7 //Alarm Mess
AN
M 134.7 //Alarm Horn
S
M 134.7 //Alarm Horn
R
M 99.4
R
M 99.5
R
M 99.7
//;
A
M 134.7 //Alarm Horn
L
S5t#20s //Reset after a time
SD
T 99 //Time Horn off Auto
A
T 99 //Time Horn off Auto
R
M 134.7 //Alarm Horn
//;
A
M 107.3 //Summary horn flag acknowledge
R
M 134.7 //Alarm Horn
A
M 107.2 //Summary ICM alarm acknowledge
S
M 107.1 //Summary alarm-flag ICM, AIN, ALARM, SEQU
Call
Exec-FB or FC from Screen
in
the Accumulator 1 the Interface-value is transferred for evaluation
A
setpoint in the recipe editor can be write-protected
by
adjusting '-e' in the recipe editor.
Example: 2.123-e,3.12
Reset
the Alarms at the beginning of a Unit
A
M 102.2
R
DB725.DBX 101.4 //"SEQ".u.STATUS.boMsgError
R
DB725.DBX 103.5 //"SEQ".u.STATUS.boMsgSystem
R
DB725.DBX 103.6 //"SEQ".u.STATUS.boMsgWarning
R
DB725.DBX 103.7 //"SEQ".u.STATUS.boMsgOperating
Braumat-Shortcuts
If
ICM is in manual you can switch on/off directly without the window
by click on the object and press “CTRL” at the same time
You
can open the Image-design directly from the Process-Image by “CTRL”
+ Doppelclick on the picture.
You
can open the Image-design Text-file from the Image-design by “CTRL”
+ Tab-key Doppelclick on the picture. But you have to close the
picture first in order to change it.
No
checkbox “change picture” at Smart Unit
Open
\sys\controls.ini
[SmartUnit]
;Disable
MessageBox on picture change
AskForPictureChange=0
Security-Topics
Braumat
can run as Guest without Administrator-rights.
Route
Control
If
you are in the online-view of Route control you can right click on a
element an jump in the picture where the element is located.
Parameterization
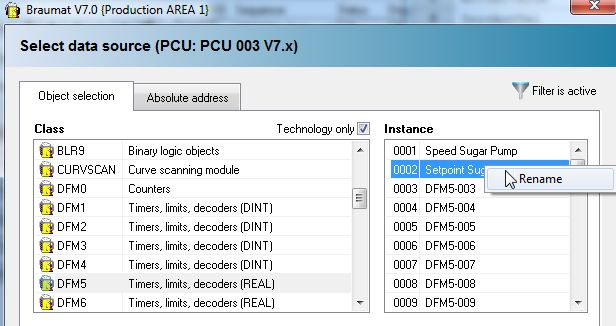
The
Instance-Name can be changed directly in here.
SQL-Server
To
activate SQL-Server in a Braumat-System a license must be installed.
Then in Site-Configuration, Server, „SQL-Server“ must be
checked. With click on that Button a window pops up and the address
of the partner can be adapted and data to be send to SQL.
On
the SQL-Server an Adapter-Software has to be installed to view and
adjust the Data going to SQL. On that Server MS-SQL-Software can be
installed for evaluation or Crystall-reports.
4Replay-Mode, Video-Mode
The
Video-Mode can be used from V7.1 SP1.
It runs as
well with old PCU-Version
V 5.3 or V6.0 etc.
It
has to be activated in the Site-configuration by “Log
Process-data” and “Show
Process-Data” at IOS and PCU!
In
the Image-Design the Pull-Down-Menu “Tools”, get tags
for the recording-function“
has to be activated in order to get the necessary database. It
can be filtered which pictures are relevant for to be logged.
After
restart of Braumat in the PCU-Server, Display “coupling-status”
a S7-Logging-port is coming up and shows how many tags are logged.
In
runtime of the Process-Image, the Video-Mode can be activated by the
pull-down-menu.
In
the Order-System, history, Batch, right click a time-stamp can be
setup in order to start the according Video.
In
the Message-System, right click on a message a time-stamp can be
setup in order to start the according Video.
The
size of the Archive can be modified by the function
site-configuration, settings, “days for log”. 90 days
might be a reasonable value.
The
data can be stored on a separate disk.
4.1Seat lifting Block
In
order to use that function, an ICM must be defined as seat-lifting
block in the Parameterization. Then in the Picture this valve can be
setup as seat-lifting block.
4.2Run Braumat with S7-300
You
can integrate a S7-300 to Braumat without the need to have any
Braumat-Software in the PLC. You can visualize all values in the
Graphics and change them.
Integrate
a new S7-416 with the Function Administration and configuration like
this:
Then
open the file \windcs\sys\area.ini and write “Sistar=0 “to
the PCU S7_300
[S7_300]
Name=S7_300
EnableRecipeControl=0
Family=S7
IP_Addr=192.168.0.2
l2_addr=2
SW_Recipe=V5
Sistar=0
Communication
can be by Ethernet or MPI!
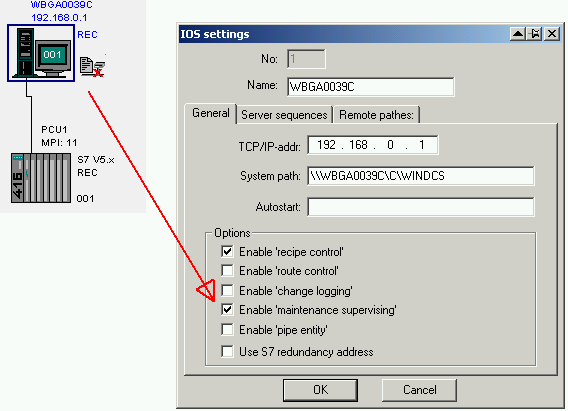
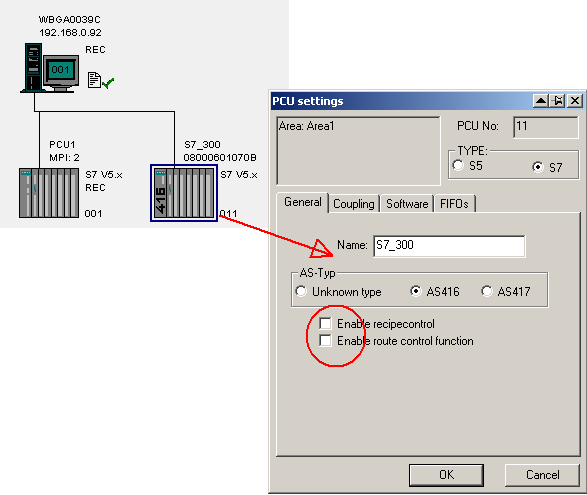
4.3Monitor and control a S7-400-PCU with Braumat-OS without
Braumat-Software in the PCU
You
can integrate a S7-400 to Braumat without the need to have any
Braumat-Software in the PLC. You can visualize all values in the
Graphics and change them.
Integrate a new S7-416 with the
Function Administration, Configuration.
Uncheck
Recipe-control
Then
open the file \windcs\sys\area.ini and write “Sistar=0 “to
the corresponding PCU
[PCUx]
Name=remote_PCU
EnableRecipeControl=0
Family=S7
IP_Addr=192.168.0.2
l2_addr=2
SW_Recipe=V5
Sistar=0
4.4DFM-calls on FB100x is obsolete
With
this call “UC FB715” or UC “TA_CALL_DFM_FB”
the call of the FC736 etc. for DFM is not necessary any more.
In
Version V7.0 there the User-Block FC 2715 can be used.
4.5Telegram-forwarding to another Area (in Case only on Area has RCS)
Change
in PCU_serv.ini
[protocol]
30=PC-Name
of RCS-server; this has to be setup on NOT-RCS-server
...
36=PC-Name
of RCS-server; this has to be setup on NOT-RCS-server
Enable=1
Test
on RCS-server Window 2nd Tab
In
order to ensure RCS-Server switch over.
In
the Servers where no RCS is running
PCU_serv.ini
in Server X: the frist Server of the other Area
PCU_serv.ini
in Server Y: the second Server of the other Area
4.6Upgrade SQL to new version
Delete
Folder \Spooler.cis\dbf (it will be generated again!).
Test
SQL by
4.7Virtualization
For
installation use ISO-files or USB. But USB might be linked only to
one VMWare!! You have to remove always until you can connect it to
another one.
Upload/Download
right side Storage, right click “oben Files”.
Datastore
for ISOs and upload
Open
VMWare: open Console
CD-Symbol
for to mount ISO-File
Synchronize
pictures with other IOS
Please
set in Biko.ini:
CopyFilesToAll=1
4.8Change name of the IOS for display in the message-line
In the file
<projekt>\texte.0\ios.txt the names for Display in the messages
could be defined.
4.9RCS-Activation
Select
RCS in the Site-Config for the according PCU
Install
RCS-Software and insert in a new Database the PCUs you use
(ID=PCU-Nr).
Activate
RCS
Call FC820
TR_CE_ICM=TRUE
in FB1200, 1201, 1220,
1225
Change
in \Windcs\sys\pcu_serv.ini at Recipe-server, ports add
“RCS_PORT.DLL”
Call
in FB100x
In
the FIFO (1 for Server 1, 4 for Server 2) add the telegram types
30,31,33,34,36
//no
way detected
U(
L
"SEQ".u.iROUT_ID
L
0
>I
)
U
"SEQ".uRCS.QREQ
U
"SEQ".uRCS.REQ
UN
"SEQ".u.CTRL.boRestart
S
"SEQ".u.CTRL.boPaused
//
RCS-Alarm --> stop recipe
U
"SEQ".uRCS.QERR
U
"SEQ".uRCS.REQ
UN
"SEQ".uRCS.ACK
S
"SEQ".u.CTRL.boPaused
//sequence
stopped
UN
"SEQ.RUN."
R
"SEQ".uRCS.REQ // Way off
R
"SEQ".uRCS.RON
SPB
r001
L
0
T
DB725.DBD 400 // Modes off
r001:
NOP 0
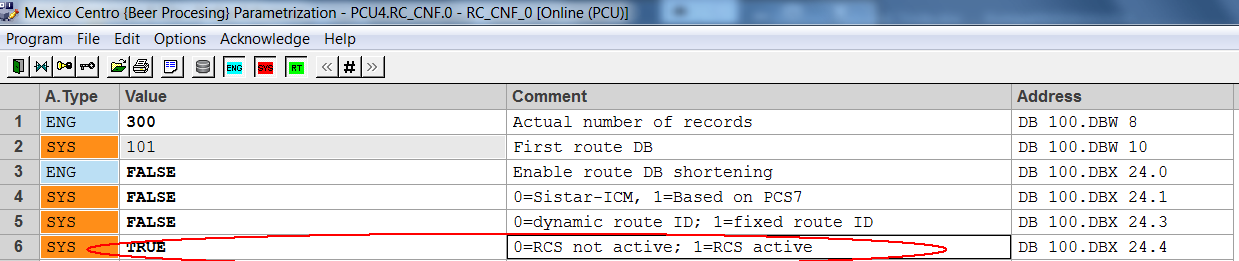
There
is a main-switch for RCS in RC_CNF_0 Global data
4.10How the performance of Braumat can be tested and increased?
Press
Strg (Ctrl) + Shift during opening a picture and the times are
displayed for all steps to open a picture.
Check the
Trace-Server for error-messages.
Ensure
the Network of the PCUs is physically separated from the network of
the IOS.
Check the
cables, Router and firewalls, to be correct.
The
fire-wall in the switches can slow down the network, maybe in the
Process-bus it is not necessary?
In
Site-Config: Link 50 % of the clients to Server 1 and 50 % of the
clients to Server 2. Open Site-configuration, Client, Tab Server
Sequences and select for one group Server 1 and vice versa.
Reduce
the number of open window in \Project\sys\sys.ini
;Maximum
account of SISTAR-Windows to a reasonable value maybe 7;
Reduce
the number of Sequences in the PCU to running sequences + 10 % in
parameterization, Sequences, Global data, number of…
Do the
same for PID, AVA, AOUT and ICM 1-4; Switch off complete ICM-groups
if not needed.
Take care
not to log the Analogue-Values to fast in the Trend-definition. For
temperature 10 seconds is enough etc.
Cross-Communication: reduce
number of Jobs (only one DB Send/Receive), reduce time for Jobs, 3-4
seconds,
Windows-Colours: Resolution high colour is
enough!
Put User-Functions in FB1225 1 sec. or
FB1001.....
Take a
look in Windows with the command “msconfig” which
programs are loaded during startup. All are really necessary? But
some services etc are necessary!
New S7
CPUs are faster. But in this case the CP has to be changed as well.
Most fast is the configuration that the communication is on the
CPU-module.
In
serious cases it is possible to let the Trend-Manager and curves run
only on one Server. In a virtual system, the logging of trends one
server is enough. Because a VM-Ware hardly crashed, only the
complete PC.
In the
Windows Task-manager you can see which programs take a lot of
performance.
In the
Hardware-Configuration the Network-Resources can be set to 50%. But
it will use only the Resources needed for communication (not 50!).
Ensure
that the virus-scanner are not working continuously over the
network.
Use ping
192.168.0.1 -t to request permanent responses. If there are
time-out, something is not correct on the network. The time should
be always <1ms
Use
tracert 192.168.0.1 to check all router and switches on
performance. There should be no time-out.
5The trigger for the curves does not work properly
Maybe some
trending from the wrong area are requested?
5.1How to have save Remote-Access on Braumat
In order to
have save Remote-Access on Braumat it is recommended to connect an
Office-PC to Internet and not
the BRAUMAT-Bus.
Remote
Access on this PC by Teamviewer, Cisco-Anyconnect, Sinema etc.
From this
Office-PC by (an extra network-card?) one Network-cable to
Braumat-PC, but a Firewall (Software or Hardware) in between.
Remote-Control
to Braumat by MS Remote Desktop or UltraVNC. File-transfer is
possible.
For more
security call prior to remote-session, plug in the cable and unplug
after finish session.
5.2How to integrate own functions in Braumat
In order to a
description for a DB in the Parameterization, open in \PCU.00x a
textfile with the extension .pcu
object
Name=DBxyz;(*Name*)
CID=1920;
max=128
offset=100;
length=100
number=DBW8;
filename=Name Textfile;
{
Number of (1,DBW8,I16,RD);
(*Number of*)
struct
Braumat_V7 (1, DBX43.7, B1)
(*Braumat_V7 = 1 read/write*)
Name (2,DBB4, I8);
(*Describion Integer 8*)
Word (3,DBW4, I16);
(*Describion Integer 16*)
Sequence (4, DBB0, ENUM_P:SEQUENCE,
0, 128) (*Sequencer Textfile from 0-128*)
ZSW, RT
(5,DBW16 , HEXA,RD ) (* ZSW Status word of Simocode Read only*)
}
ZSW, RT only display
ZSW, SYS only
display when button Sys
5.3How to use a Braumat V7-Reference
In Braumat V7
the address-pointer for a source is now 64 bit. In this way you can
get the address:
:
CALL
BmGetRefValDIntFC(Ref := u.refQDat, RET_VAL := xRetVal, Result :=
diValue);
//
Take value if it is valid
UN
xRetVal;
SPB
ERTA;
L
diValue;
T
#u.diValueAV;
L
#u.diValueSP;
==D;
=
#u.xResult;
ERTA:
SPA ENDE;
Important:
the consumer of the reference must know which data type he expects
for further use. If the above reference points to a REAL attribute,
for example, the BmGetRefValDIntFC automatically converts to DINT.
5.4How to get an old free protocol mdb-Database on new
Braumat-versions
Install
an office 2003 and convert the database to a new file. Rename this
file to MS to PI_charg32.mdb; Start MS-Access from the main-menu with
the database PI_charg32.mdb. Maybe some adaption might be necessary.
● Due to the changed license structure and the path
separation "System" and "Project" the integrated
MS-Access macros had to be adapted in the provided example MDB
"<syspath>\! BM_Proj\Access32\PI_CHA32.MDB" can be
adapted.
● Existing
project-specific MS-Access applications for "Free Protocols"
from earlier BRAUMAT versions must be manually upgraded with the
current MS-Access macros.
● The
full product MS-Access is required for this.
5.5If the Area-Selection disappeared
In Sys.ini
Section PC there is a switch ShowAreaDlg=1 or by starting the
Application and press Strg + Click;
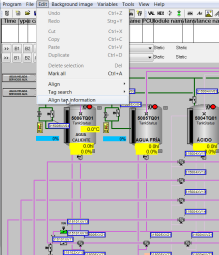
5.6Align the Tag-Info
To
align the Tag-Info switch to Tag-Info and mark all and select edit,
Align Tag info
5.7Change PCU-number in Process-Images
In Version V6
the Tool BikoUpgrader.exe can be used.
In V7 it can
be done by replace-function: Replace PCU,2,x by PCU,2,y
5.8TANK STATUS
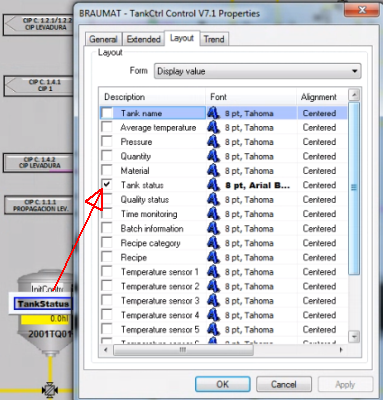
In this way
the status of the Tank is displayed in the process-image and by click
more details are coming up.
L 1
//Status of the Tank according to the List..
T
"TANK".au[x].iTankStPv
SET
=
"TANK".au[x].xMonQualityOp //starting according
Monitoring-Times, but the tank needs to be in that Status!
R
"TANK".au[x].xMonCleanOp
R
"TANK".au[x].xMonSterileOp
The according
Status can be found in d:\Windcs\texte.x\TankStatus.txt
1 Clean
2 Sterile
3
Filling
4 Filled
5 CO2 preloading
6 Emptying
7 CO2 preloaded
8 Empty
9 CIP
10
Ready to fill
11 Ready to empty
12 Ready for CIP
More
=
"TANK".au[112].rQuantityTotal // Correct Total Tank
quantity
= "TANK".au[112].xSetMat // Set
Material value and Transfer Material-Number to Source
=
"TANK".au[110].xReset //Reset all
Only if line 9
and 14 are equal and it is Approved the Quality-Time will be started

Example for
Parameters

Note:
Tankstatus
can be changed directly in "TANK".au[1].iTankStatusAct and
the pulse for "TANK".au[1].xSetMat is not necessary.
That Impulse
will change the Brand as well, and that is allowed only when the Tank
is empty!!!!!
5.9Integrated delay-Time in EOP
Often a
delay-time is used to switch on something delayed etc. Braumat is
shipped with a delay-Unit for each unit or to have a minimum Time for
a Step.
Start delay time:
L 3 //Time in sec
T
DB725.DBW 184 // "SEQ".u.iSPDlyTm Setpoint Time
The
result-flag is M 101.1
5.10Free Recipe-based brew-report (from V8.0 on)
Single-value
(overwrite the same) or Multiple-value
Names and Unit
can be edited
also values
for the Units values can be defined.
Esport /
Import to Excel is possible.
In recipe EOP
right click then list will pop up;
Setpoint or
actual-value
for each
Setpoint different Parameters
User-Id for a
User-defined value independent from EOP
RUP-Start /
Ende;
Order-System:
right Mouse-click -> Charge report
5.11How to make a monitoring-function?
In
order to switch on ICM from several Units ore making Sub-operations
you can program in FB 100x like that:
A "Unit106
DB".Bool48 //activation-flag
JCN end4
A
"DFM8.171"
= "312322XV07-CMD"
//action
end4: AN "Unit106 DB".Bool48
//reset at the end
FP "Unit106 DB".Bool108
//reset by pulse
R "312322XV07-CMD"
That
means in this way the output and flags can be activated from
different Units. <
Flag always
“1”
If
you need a flag which is always “1” take M 108.1;
Copy
a data-set in Parameters.
It
is possible to copy a dataset in the Parameters, with pull-down
“Edit” “copy to” or “copy from”
5.12Backup and Analysis (25.3.2019)
To ensure quality and safety,
a regular backup is mandatory. Maybe at the weekend when production
is down this is possible.
Braumat:
Transfer all DBs from PCU to IOS;
Simatic-Manager:
Backup all Blocks of all PCU.
New
cross-reference generated for all PCUs
CPU
Error-check all PCUs
Reorganisation
of the project
Clean
up not used folder
Compare
all online / offline
Check
Traceserver
To
get the faults, the I/O-Alarms of the CPU can be filtered by removing
at Setting “asynchronous” errors. And then the
program-errors pop-up.

6Not enough decoders? 11.2.2018
Especially if
Matrix function is used, decoders might not be enough. In that case
it helps to multiplex the Decoder that means to use the same
Decoder-number in parameters and to call FC 636 with the according
DFM directly before using the Decoder-flags.
Copy
/ Paste in Parameters
Is
possible, if it is the same Datatype!
6.1Recipe-System: Release a Unit and resume later on
Two batches
require subsystem 3 (e.g. heater) several times at different times in
their sequence.
subsystem 3
can released and used by subsystem 2, although it will be in recipe
subsystem 1 again at a later point in time and is required by it.
Subsystem 2 does not have to wait for Unit occupied in a different
recipe
enable this
function in the file "<proj-path\recipe\project\plant.ini":
[ReleasePlantSection]
Enable=1
A release Unit
step must be inserted in the basic recipe editor.
The release of
a plant section is only possible in two cases:
- There is a
synchronization before and after the release.
- Before the
release there is a recipe operation and after the release there is a
synchronization with Type AND.
OR
synchronization are not allowed before and after a release Unit.
7Send / Receive with 3rd Party devices
CALL
"AG_SEND" // FC 5
ACT
:="CLCK_0_5HZ"
ID
:=6
LADDR
:=W#16#3FFB
SEND
:=P#DB4106.DBX0.0 BYTE 28
LEN
:=28
DONE
:=#Temp1
ERROR
:=#Temp2
STATUS:=#Temp3
CALL
"AG_RECV" // FC 6
ID
:=2
LADDR
:=W#16#3FFB
RECV
:=P#DB4093.DBX0.0 BYTE 28
NDR
:=#Temp4
ERROR
:=#Temp5
STATUS:=#Temp6
LEN
:=#Temp7
7.1Display manual valve with feedback close and Alarm open /
I
want to create new Braumat object with three states. For instance -
in the plant there is manual valve with two sensor going to Braumat.
First sensor is confirmation of valve position opened.
The
second sensor is confirmation of valve position closed.
So,
in the process picture i should put an object with 3 states:
1)
Green - (sensor_opened = 1 and
sensor_closed = 0)
2)
Gray - (sensor_opened
= 0 and sensor_closed = 1)
3)
Red - (sensor_opened
= 1 and sensor_closed = 1) or
(sensor_opened
= 0 and sensor_closed = 0)
There
a two ways to realize that:
First you take 3 Symbols: one
Manual-Valve with Feedback on to display: “Open”
Then
one symbol next to it e.g. Text “CL” for close with
Feedback closed
Then
one more symbol next to it e.g. Text “F” for to display
the faults.
The
other version is by status byte:
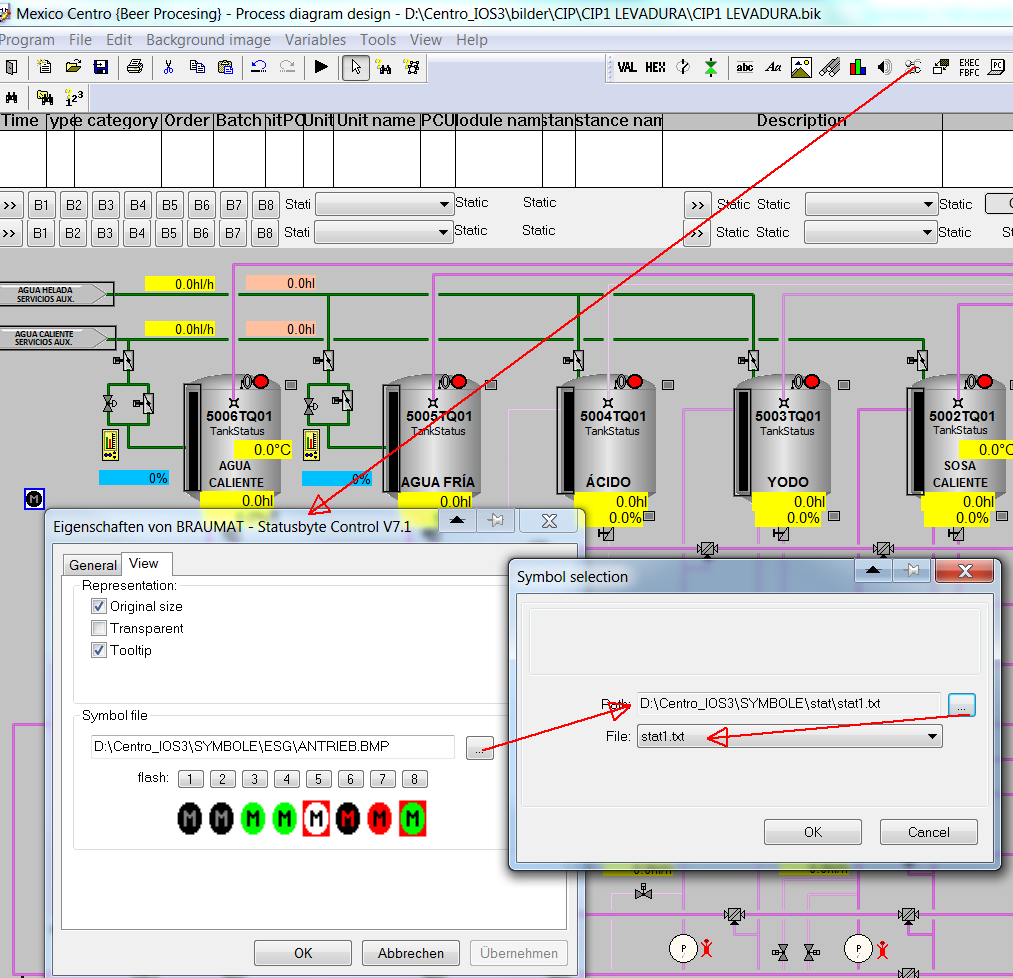
In
Stat1.txt the names for the 3 symbols have to be Green/grey/red are
listed
\windcs\symbole\stat\
sym_close.bmp
\windcs\symbole\stat\sym_open.bmp
\windcs\symbole\stat\sym_fault.bmp
Then
the according number 0/1/2 has to be transferred by Step7-code in the
address mentioned in statusbyte:
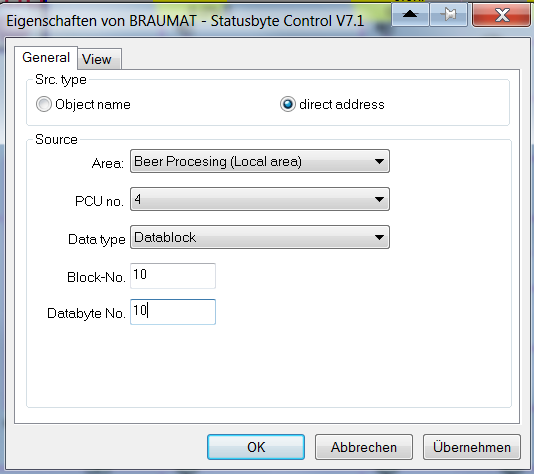
0
= feedback closed
1
= feedback open
2
= Fault
8Changing the PCU-number of an image
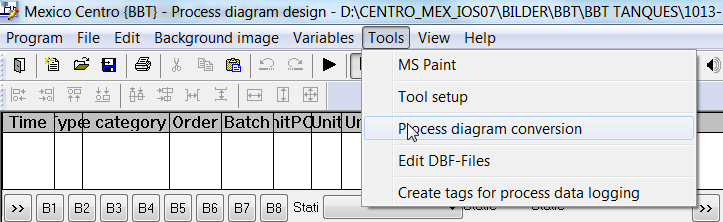
In
image design select this
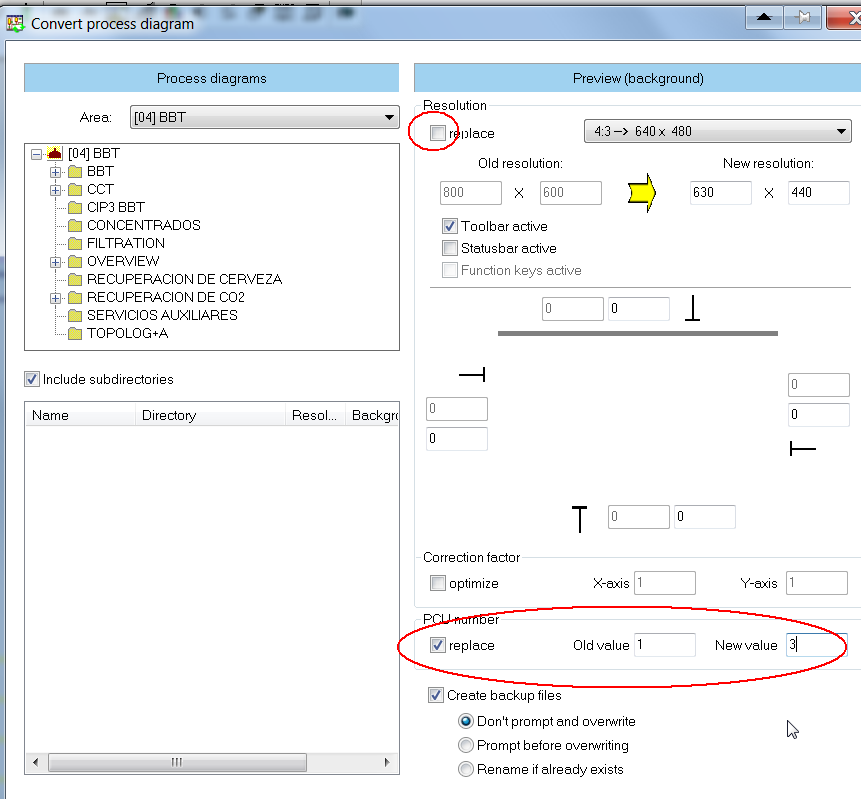
And
here input the old an new PCU, uncheck replace.
8.1Interlock by flow control of the pumps
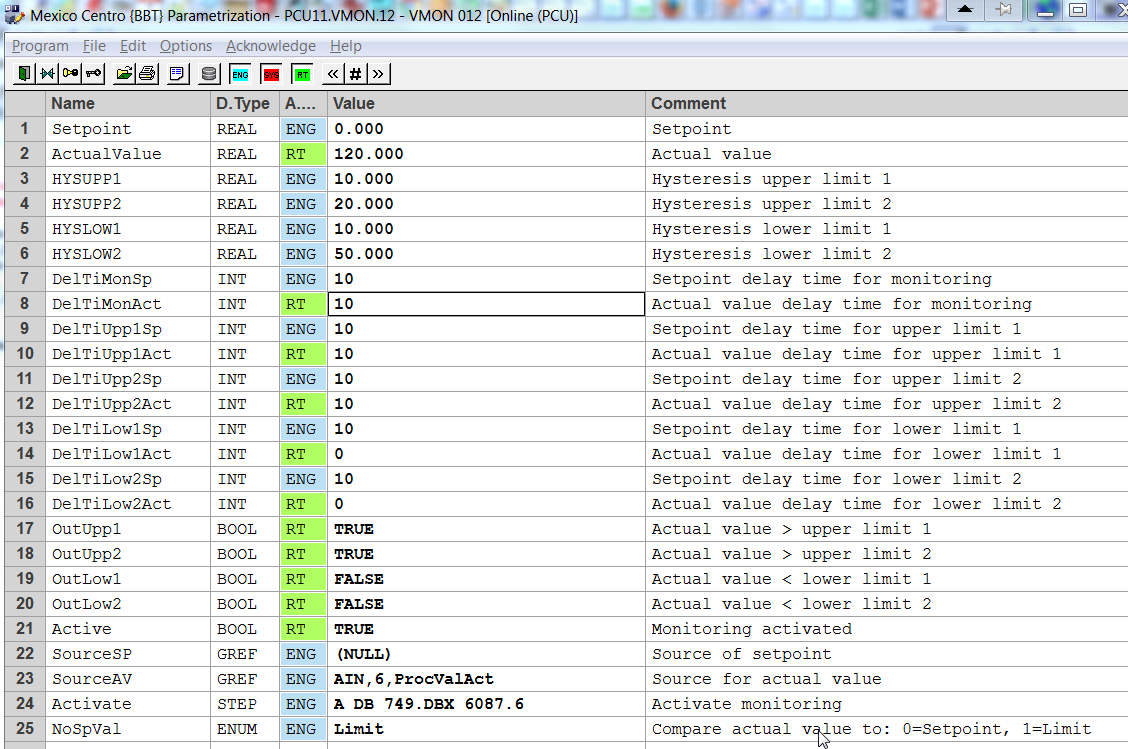
Activate
a VMON by the feedback of the Pump, configured as “Limit”
and with the Source of actual value of the Flow.
Programm
like that for the ICM to generate a fault:
A
"VMON".au[12].boValOutLow2
AN
"BmMsgCmd".abo[1035] //Message : Pump xy flow Alarm
S
"BmMsgCmd".abo[1035]
S
"ICM4".au[85].xErrMem //ICM-Alarm
AN
"ICM4".au[85].xErrMem //Acknowledge was done
R
"BmMsgCmd".abo[1035] //Reset Alarm
There
is no interlock necessary anymore
No
Interlock of Main-ICM for Seat-flushing
If
the Main ICM is interlocked, Seat-Flushing is not possible.
To
avoid that program like that
AN
CMD_BSL_FLT.BSL01 //Interlock
ON
"ICM1".au[203].xManualMode //no Interlock if in
Automatic
=
"ICM1.203-ILock"
In
automatic Route-control or the program ensures safe switching of the
valve, so that ensures enough interlock. No additional interlock is
necessary in that case.
But
for security this should be used only for the valves with
Seat-lifting blocks.
Additionally
the flag for CIP-running can be used.
AN
CMD_BSL_FLT.BSL01 //Interlock
O
A
M x.y //CIP running or pulses are active
AN
"ICM1".au[203].xManualMode //no Interlock if in
Automatic
=
"ICM1.203-Ilock"
Drain
Vessel before start CIP
In
order to start CIP the vessel should be empty but often liquid from
the wall cover the empty-sensor. A short opening of the Drain-valve
(3 sec) can help to start CIP.
In
the according EOP
L
3 //3 seconds opening
T
"SEQ".u.iSPDlyTm
L
"SEQ".u.iDlyTm // "SEQ".u.iDlyTm
//actual value Time
L
"SEQ".u.iSPDlyTm // "SEQ".u.iSPDlyTm
<I
AN
"TIMER1".au[45].xOutNeg //empty sensor
AN
"EopStop"
=
"BBTXX_USR".CA.boxxxxXV27 //Drain valve
8.2Set Unit to A- by Alarm
Use
a Impulse and Reset
R
M 102.0 //A+
R
DB725.DBX 102.0 // "SEQ".u.STATUS.boSeq_NotHeld
Display of EOP-number in the graphical recipe
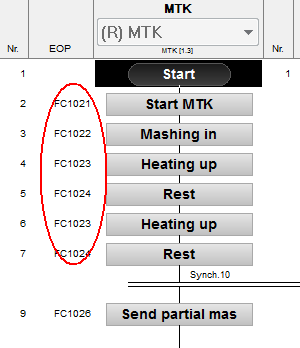
Change
in editrec.ini
[Version3]
;Add
coloums for step number (=1) and basic operation number (=2) in
grafic display
AddCol=2
;Mode
for the display of the basich operation number (0=only the number;
1=display plc-block; 2 = display number and plc-block)
GopNrDisplayMode=1
9User defined Faceplate
Create
a process image “.bik” that
will be used as a faceplate.
Same
faceplate can be used with different index, meaning the data will
that is shown in faceplate can be dynamic.
There
are different Variants of addressing in faceplate:
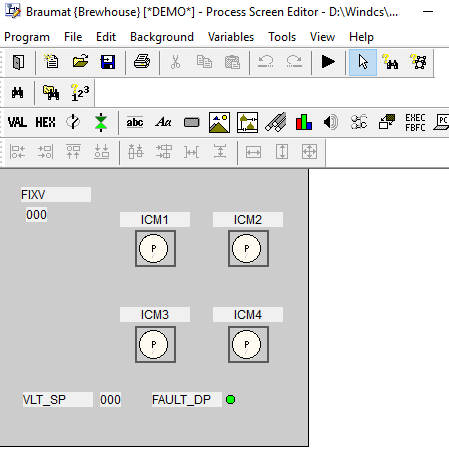
Insert
a user defined faceplate with “Dynamic process image”
control

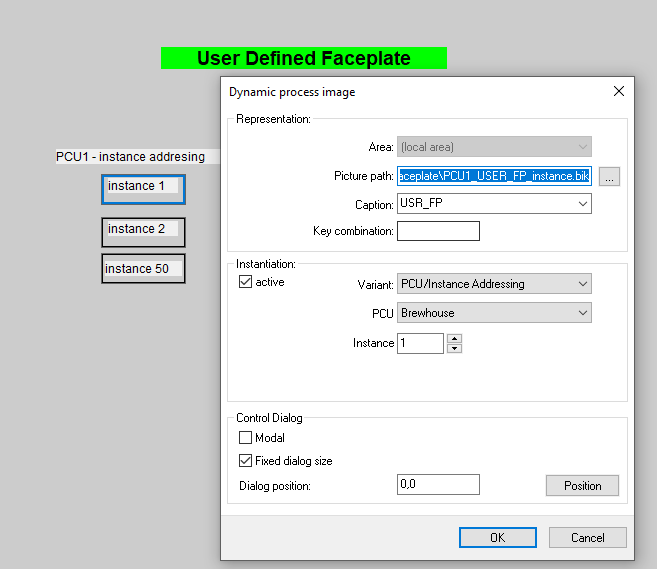
10Second Server does not start
Copy
Fifos DB670-676 and DB690-696 to PCU if CPU is in Stop and no
production.
Code-Card
Reader
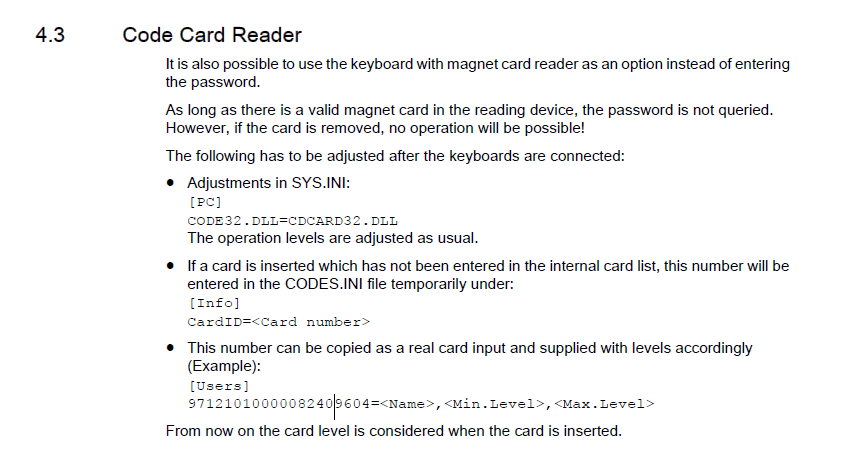
BLR-Objects
There
is a predefinition for the objects
ICM1
BLR 1
ICM2
BLR 2
ICM3
BLR 3
ICM4
BLR 4
Sequencer-Permanent
conditon BLR 5: 1..128
BLR
129-255 are free
BLR
6 to 9, which are intended for use as step enabling conditions. They
are not processed cyclically and need to be called by the following
if used outside the Recipe-EOPs
CALL
"BmGetBlrResultFC"(
BlrIDB
:= 2111,
BlrInstance
:= 42,
RET_VAL
:= xRetVal,
Result
:= xResult);
11S7-1500-Tips
To
activate EOPs call them
Convert
FB100x-> FC300x
It
is not allowed, to add Parameter to the Unit-FBs
all
System-DBs should be downloaded completely in one Block
New
User-defined reports V8.0
A
report file ("*.dbf") is created in the archive path in the
"Report" subdirectory for each batch
Value
type = Multiple value → 1 Data set (overwrite mode)
● Value
type = Single value → Multiple data sets (insert mode)
● Value
type = Total value → 1 Data set (several values are summed)
The
step protocols and other telegram types of BRAUMAT/SISTAR serve as
data sources for the KOP data.
The
delivery includes a set of KOP definition lists in the form of CSV
files
The
source definitions are assigned to one of the lower-level RP objects
RUP (recipe unit procedure), ROP (recipe operation) or setpoint.
The
generation and display of the batch reports is carried out in the
batch management application.
d:\WINDCS_DEMO_NEW_V71\Report\BatchReport\Template\BM_BH_RecProcReport_00001.xlsm
After
the batch sequence, a batch report can be created for each recipe
procedure using prepared MS Excel report templates.
This
is done directly in the archive view of the "Batch management"
application by right-clicking on the desired batch.
Recommended
Windows Settings
fixed
Swap file size (12 Gybte?)
Deactivate
windows energy saving options
Use
entries in the “hosts” file of the operating system for
project related IP-addresses and host names
The
standard location of the file is “C:\Windows\System32\drivers\etc”
SOFTNET-IE
S7 (SIMATIC NET) is used for PCU Communication
Switch
value with Setpoint-DFM
With
the Setpoint-DFM it is possible to switch between two values, e.g. a
fixed value for the VLT and “0” for to start from “0”.
No
Acknowledge ICM Alarm on all PCUs
PCU_SERV.INI
[Trans_NT]
;List
of PCUs without ICM-acknowledge NoAck=1,2,8
“Read
only” PCUs on Client or Server
PCU_SERV.INI
[Trans_NT]
List
of "read only" PCUs
NoWrite=1,2,8
11.1Having specific pictures and Text-files on specific IOS
If
one Client requires specific pictures, main menu or ini-files, on the
Server on Windcs\IOS.00x the folder \Bilder and PCU.00x\Texte and
Texte.x can be specific for this Client.
The
Batch-list settings is not yet IOS-specific.
Increase
the size of the picture for a message-face-plate, without re-scaling
the image
In
order to implement a message-faceplate without re-scaling the image,
open the picture by paint and and shift the lower border to the
desired size. Then input this new size in the bik-File.
Protecting
the PCU-Software of and the Versions
With
https://www.auvesy.com/versiondog.html
it is possible to monitor Versions and to protect the Software of
Cyber-attacks, because all is monitored very accurately. If there is
a difference between offline and online it will be indicated by a
message.
Red-colour
for “Hold-Signal”
In
order to have a good visible “Hold-Button”, in the file
seqctrl.ini and display hold with red colour
copy
Icons to d:\windcs\Icons\
adapt
the symbols you like
change
in in seqctrl.ini
[Mainwin]
UseIconDirectory=1
in
controls.ini
[Unit_Ctrl]
UseIconDirectory=1
Comma
in Paramterization in V8.x
In
V8.x it is possible to assign a comma if linked to a real-value.
That
can be assigned in the Excel-Paramerization as well: #Dep=0,1,2,3
PLCSIM
advanced
This
Software keeps the parameters although it was switched off.
The
communication in system-settings PG-Interface has to be setup
properly PLCSIM TCP/IP.
At
start virtual S7 a name has to be specified. Runtime Manager-Port
50000.
PLCSIM
Virtual Eth.Adapter is only if Hardware is used as well.
In
order to speed up performance reduce instances or use a Tool who is
doing that (contact me!).
Floating
License
In
order to have the floating-license, select File, Settings, connection
and allow remote connections on Server (with Engineering) and Client
.
Then
go on Client Edit, Connect computer, and select the Server with the
Engineering-license. Check always display nav. window and add to
search list.
11.2Automatic Switch over Recipe-Server
In
order to have an automatic switch-over of the recipe-server change
this…
Change
in \sys\recipe.ini
;Cycle
time for synchronization supervising (0=switched off)
SupervisingTime=30
[ServerSupervising]
;Enable
recipe server supervising
Enable=1
;Cycle
time of the supervising telegrams [seconds]
CycleTime=10
;Number
of missing telegrams till server supervising genreate a message
ReactionCycle=24
;Time
[seconds] till the server failure message will be repeated
RepeatTime=300
;Waiting
time till server supervising begin after start of Pcu-Server
WaitTime=240
;Automatic
Server activation
AutomaticServerActivation=1
Order-system
only for specific Recipe-Types
It
is possible to call the order-system (Bali) from process-image only
for specific recipe-categories.
e.g.
baliedit.exe Order 0 16 means show all order with Recipe-type 16;
Occupy
Orders or remove Order-numbers in the Order-system 20.1.2020
Open
Order-system, close Order-List, Iosen, open “engineering”
and then Order / Batch-numbers. There is is possible to delete or
define the numbers.
One
IOS is not switching to Recipe-Server 4.2.2020
If
it is TCP/IP with ping Adress the Network-response-time can be
tested. Should be 1 ms or below.
Checking
the Fifo 2/5, whether it can be reset. Maybe restarting the PCU can
help. If not possible downloading the Fifo DB 671/691 during run.
Checking
the Sendpuffer 2/5, about the Block-size and maybe reinitialize.
Maybe restarting the PCU can help. If not possible downloading the
send-buffer DB675, DB694 during run.
11.3Increase performance of a Braumat-system
In
the PCU-Server, Display coupling, the time can be seen, how long it
takes to transfer Data.
Testing
the network can be done with ping Adr -t; Then it is continuously
sending and there should be no time-out.
Decrease
the number of instances of Units, PIDs, Analog, VMONs etc.
11.4DINT or REAL?
At
a S7-DINT or S7-REAL bit pattern you can recognize at bit 14 and 15
whether it is real or DINT.
Bit
14 = 1 is Real
B it
15 = 1 is DINT
it
15 = 1 is DINT
11.5Getting Free-Protocols generated from Step-protocols
In
order to have this, in the file SRPROT5.ini a switch Activate has to
be activated
The
file \FRPROT\Genfpr.dbf a filter has to be made for what is needed.
There
is a definition-file genfpr.def definitions can be made
An
Access-Database genfrpr.mdf servers for engineering but is not
necessary.
Also
the file SR_FRPR.ini is relevant
11.6Reset horn
The
horn is reset only in the area in which the picture is called. So the
specific sequence-overview or image has to be open.
Open
process-image in den Main-Menu in a specific area
For
this, call lzsys.exe /A:3 picture-name whereas it refers to Area 3.
Upgrade
Braumat
For
a BRAUMAT OS upgrade you always need the licenses for the PCUs (1
license per server, i.e. with a redundant server pair always 2 PCU
licenses per PCU).
When upgrading from V6.0 to V8.0 you first
need the upgrade licenses from V6.0 to V7.0 and then the licenses
V7.x to 8.0.
The required Softnet licenses are integrated from
V8.0 on, not before. It must be purchased separately for version <
V8.x.
Step-Protocol
modify order-number charge-number
search
for the corresponding file. The folder structure is year,
Recipe-type, Order-Blocks.
Change
the file name and copy to appropriate folder.
e.g.
S2000131.DBF should be change to charge-number 595: change name to
S2000595.DBF
Change
inside the dBase-File the order and charge number (Libre Office etc).
Copy
the file from Folder ANR00150 to ANR00600;
11.7Generate new protocol V8.0
Import
in global reporting Tags all preset Tags from system, for Brewhouse,
Cold-Block and Filtration.
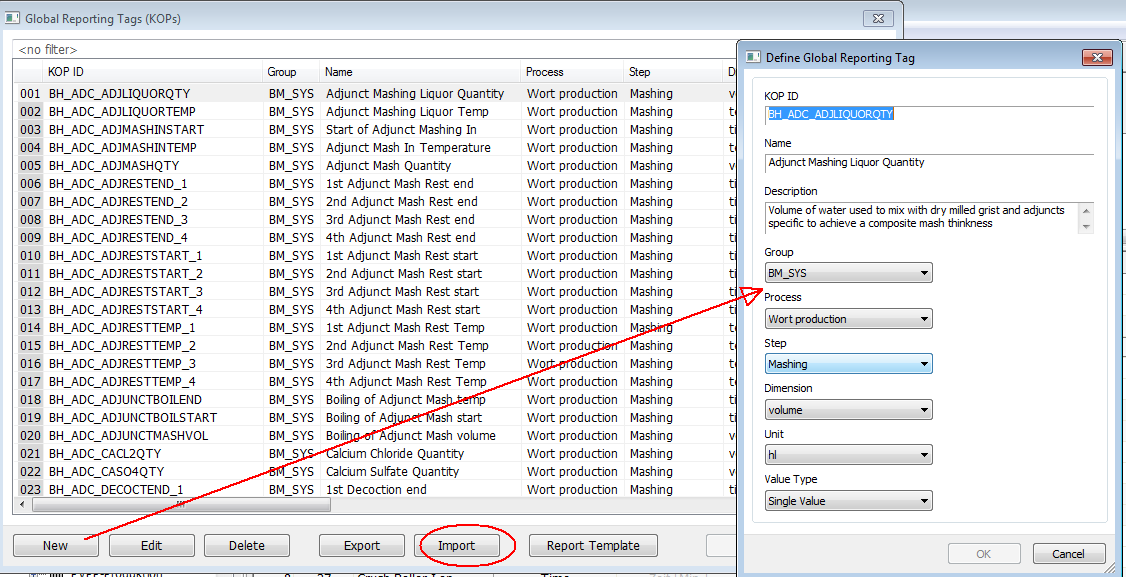
Define
Setpoint related KOPs
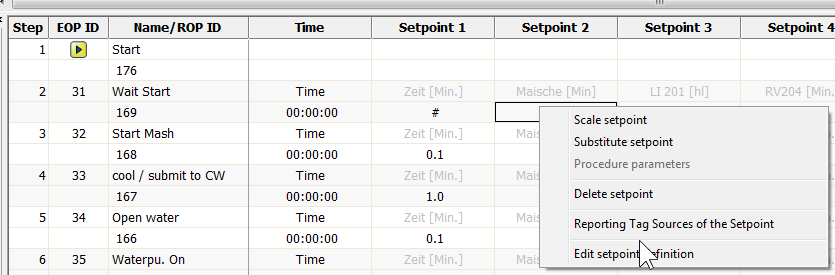
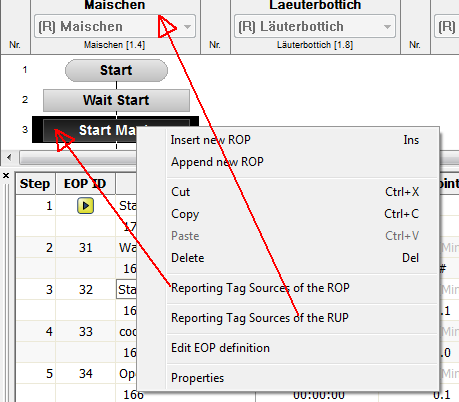
define ROP or RUP-related KOPs like Start/End-Time duration.
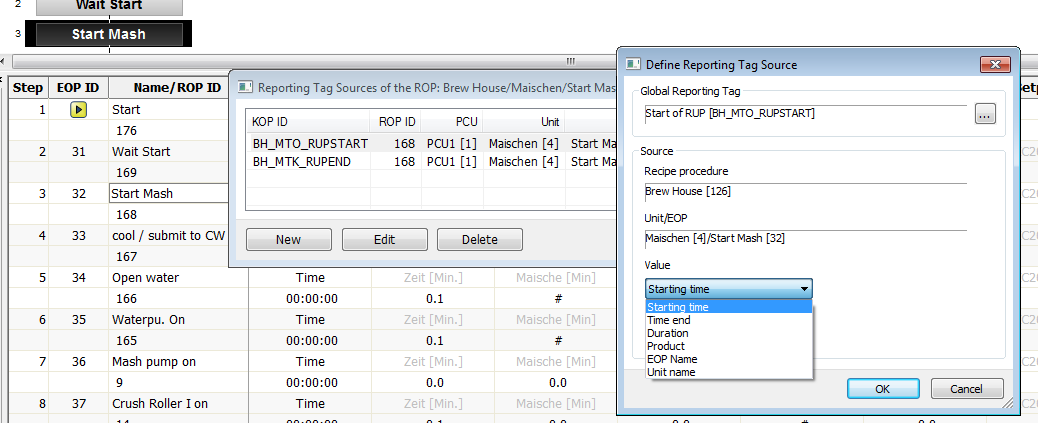
all
these options are available.
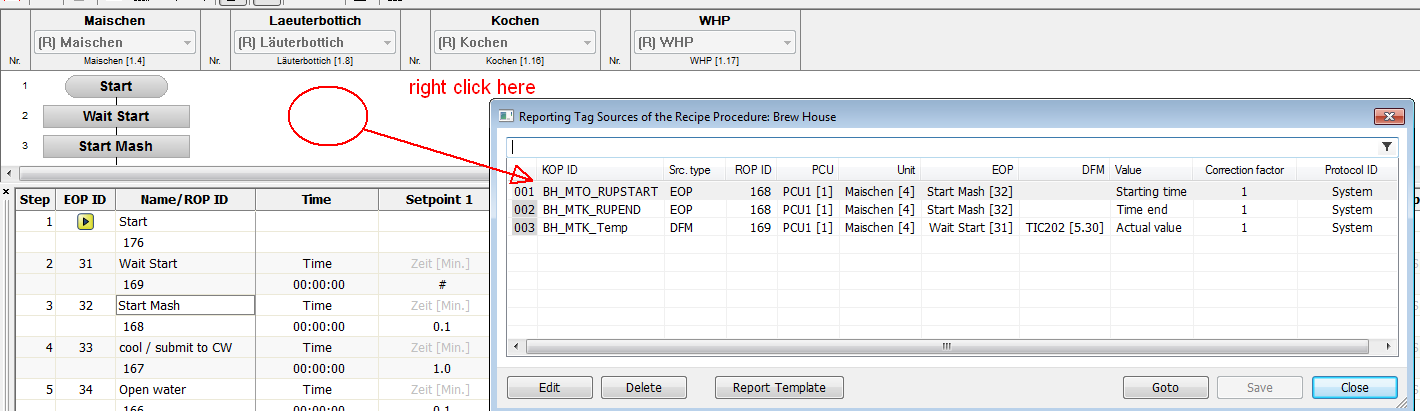 here
is a cross-reference where the tags are used.
here
is a cross-reference where the tags are used.
With
ID a PCU-based trigger can be used to have a protocol in between.
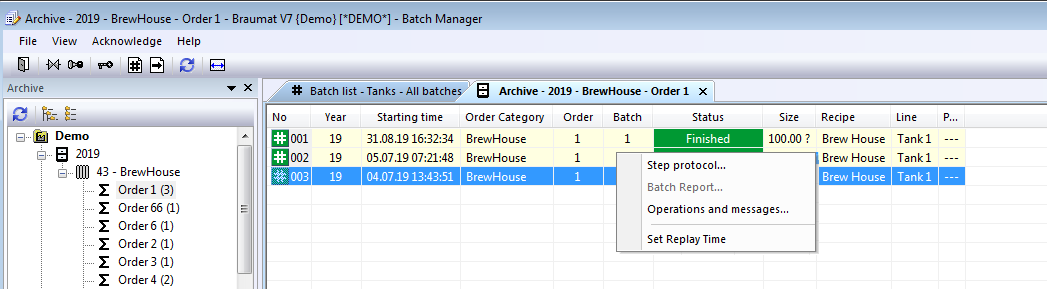
Here
the protocol can be activated.
11.8How to transfer analogue values to RCS and display it?
There
are about 100 tanks and each tank has pressure transmitter inside.
We
need to send this analog value from specific tank to the route in
RCS, for example as in the screen below:
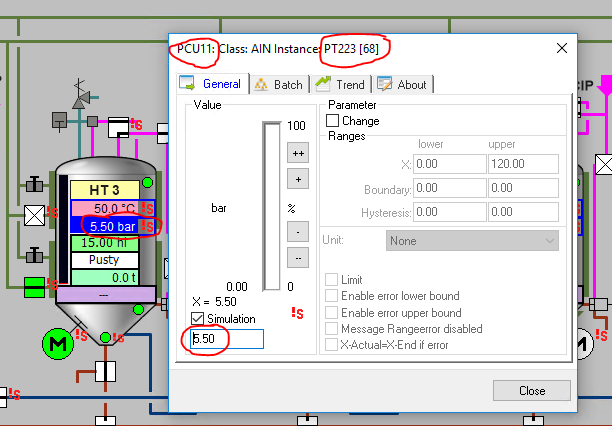
So
we just load AIN value (PCU11) to PE (Master Route is in PCU14)

In
RCS engineering we defined PE as in the screen below:
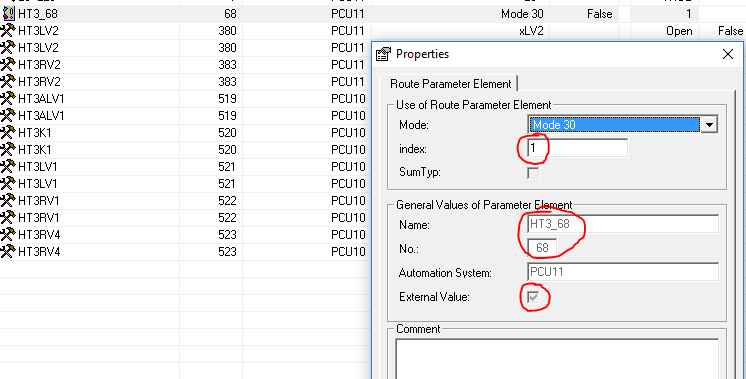
And
then this pressure value is transferred to this PE and it is working.
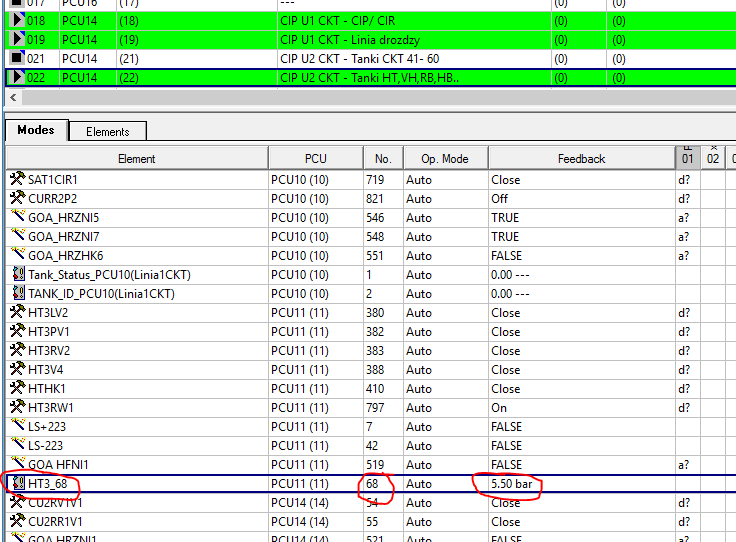
In
order to have in the master route-DB the actual values of the
external PEs from the slave routes, the correct FC 810 has to be
called on the slave side. Then the value is found in here
"auExtPeActVal".

11.9How to reset the password?
The
orginal passwort is
Name: su and Password: su;
If
it does not work, rename the file d:\windcs\sys\PASSWD.DAT
Or
in V7: d:\windcs\Admin\bm_users.dat
11.10Communication with S5-Pheriphery
IM463-2
communicates with S5-rack. Communication is achieved with link
between IM463-2 <-> IM314 cards. On the rack of ΙΜ314
there are input&output cards as configured on the HW
Configuration of IM463-2.
CPU
communicates with the S5 IO ET200M via it's own DP interface
directly.
11.11Material
Material
check
The
"BmRcMaterialIfFC [FC836]" block is the user interface for
executing the material functions for a route. The block has the
current material ID,
12Internet-Links, Hotline
Hotline:
www.siemens.de/automation/support-request
ad.support@siemens.com
http://support.automation.siemens.com
More:
https://www.automation.siemens.com/mcms/food-beverage/industry/beverage-industry/brewery/products-systems/Pages/Default.aspx